Create Your Own Fitbit
We are all familiar with Fitbit and other smart watches even our phones counting our steps throughout the day. Let’s use a micro:bit to code our own.
What You Will Learn
How to
- Create and use a variable.
- The micro:bit shake function.
- Use a while True loop.
- Display a number on the LED matrix.
- Use the button function.
What You Will Need
- 1 x micro:bit.
- 1 x micro USB cable.
- 1 x Battery pack for the micro:bit (optional).
Coding
- Open your favourite browser ( we recommend Google Chrome) Within the address bar of the browser type app.edublocks.org and press Enter . This will load the EduBlocks coding environment.
- Click on micro:bit to open the coding editor.
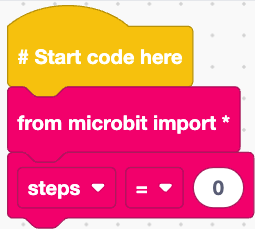
- Click on Basic . Click and drag a from microbit import * block to the code area and drop it or if you are using the new editor attach it to the # start code here block.
- Click on Basic. Click and drag a variable = 0 block to the code area attach it under from microbit import * block.
- Click on Variable and click on New variable… Give it the name steps press Enter . Click on 1 and type 0 .

Initiating the step counter to 0 - Click on Basic. Click and drag a
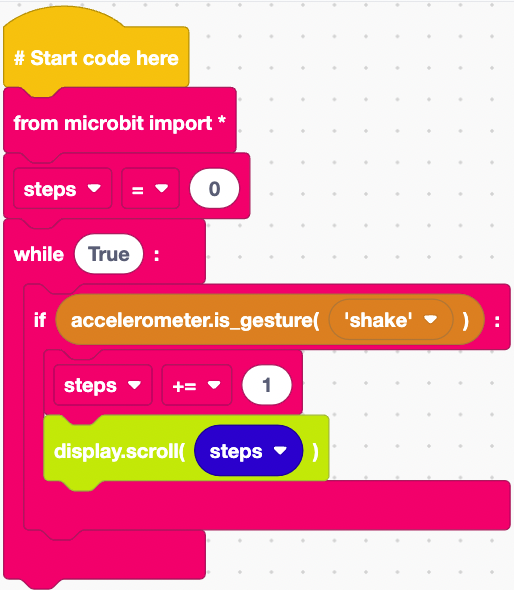
while True:block to the code area and attach it understeps = 0block. - Click on Basic. Click and drag an
if True:block to the code area and attach it within thewhile True:block. - Click on Accelerometer. Click and drag an
accelerometer.is_gesture(‘shake’)block and attach it within theTrueof theifblock. - Click on Basic. Click and drag a
variable = 1block to the code area and attach it within theif accelerometer.is_gesture(‘shake’)block. Click on Variable and click steps . Click on the = and click += . - Click on Display. Click and drag a
display.scroll(0)block to the code area and attach it understeps += 1block. - Click on Variables. Click and drag a
stepsblock to the code area and attach it within the0of thedisplay.scrollblock.
Increasing the step counter by 1 everytime the micro:bit detects a shake and displays the number of steps on the LED matrix - Click on Basic. Click and drag an
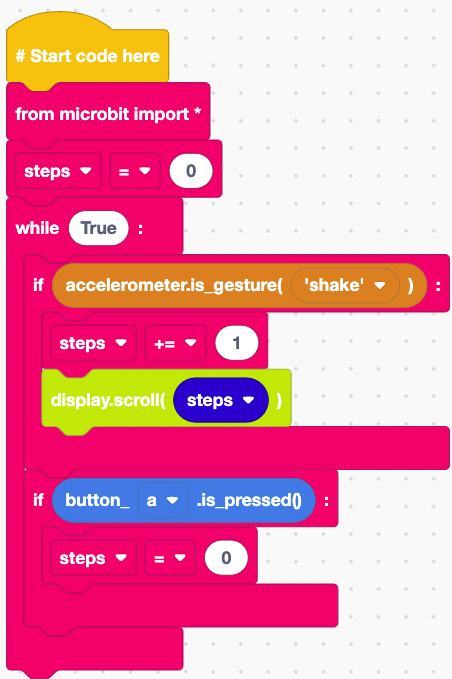
if True():block to the code area and attach it under theif accelerometer.is_gesture(‘shake’):block. - Click on Buttons. Click and drag a
button_a.is_pressed():block to the code area and attach it within theTrueof theifblock. - Right-click on steps = 0 and click duplicate and attach the duplicated block within the
if button_.is_pressed():block.
Resets the step counter to 0 - Right-click on
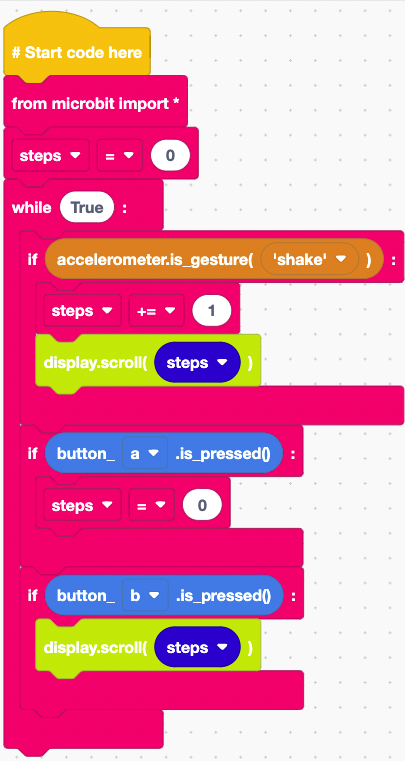
if button_a.is_pressed():block and click duplicate and attach it under theif button_a.is_pressed():block. Click on a and click b . - Click and drag the
steps = 0block to the left menu to delete it. - Right-click on
display.scroll(steps)block and click duplicate. Attach the duplicated block within theif button_b.is_pressed():block.This will display the amount of steps you have done so far when you press the B button on the micro:bit.
What is a variable
Think of a variable as a box that stores information that can be used throughout our program. We give variables a descriptive name so we and others can understand what is going on within our program.
Completed Code:

Now that we have completed the code we need to download it to the micro:bit.
Downloading the Code
- Take the micro USB cable and connect the micro:bit to the computer.
- Click on Download Hex. Click on your micro:bit drive to open it and click save.
You have created your own Fitbit step counter why not connect a battery pack and strap your micro:bit to your ankle and go for a walk and see how many steps you have done at the end.
