
Overview
Ever wondered how technology can help us understand the world around us?
In this project, you are going to become an environment detective using your micro:bitThe micro:bit is a tiny programmable computer, about the size of a matchbox, made for learning to code. It has two buttons, a grid of little red LED lights and built-in sensors that can detect movement, light and temperature.Full entry → and its built-in sensors.
Just like your senses help you explore the world, the micro:bit can tell you:
- How warm or cold it is using its Temperature sensorA temperature sensor is a little part that measures how warm or cold it is around it, then turns that into a number your code can read. As the room heats up or cools down, the number changes too.Full entry →
- How bright or dark it is using its Light SensorA light sensor is a little part that measures how bright or dark it is around it, then turns that into a number your code can read. As the light changes, so does the number.Full entry →
- Which direction you are facing using its CompassA compass senses which way you are facing and turns it into a number your code can read, from 0 all the way round to 359. North is 0, east is 90, south is 180 and west is 270.Full entry →
You will make the readings appear on the micro:bit’s LED MatrixThe LED matrix is the grid of little red lights on the front of the micro:bit. By switching them on and off in patterns, your code can show numbers, letters and tiny pictures.Full entry →.
What you'll learn
- Read the temperature using the micro:bit’s temperature sensor
- Use the LED matrix to show numbers, pictures and letters
- Detect light levels and make the micro:bit react
- Use the compass to find a direction
- Use buttons and a shake gesture to control your code
- Use blocks based on Python code
Are you ready? Let’s begin our detective adventure!
What you'll need
- micro:bit
- EduBlocks coding editor
- Micro USB cable
- Battery pack (optional)
Key words
micro:bit
The micro:bit is a tiny programmable computer, about the size of a matchbox, made for learning to code. It has two buttons, a grid of little red LED lights and built-in sensors that can detect movement, light and temperature.
Real-world example: A bit like a pocket-sized computer you can program yourself, a micro:bit can become a step counter, a thermometer or even a simple game.
Temperature sensor
A temperature sensor is a little part that measures how warm or cold it is around it, then turns that into a number your code can read. As the room heats up or cools down, the number changes too.
Real-world example: Like the thermometer that tells you if you've got a temperature when you're poorly, a temperature sensor measures the warmth around it and gives your code a number to work with.
Light Sensor
A light sensor is a little part that measures how bright or dark it is around it, then turns that into a number your code can read. As the light changes, so does the number.
Real-world example: Like the automatic headlights on a car that switch on when it gets dark, a light sensor notices the light dropping and lets your code react.
Compass
A compass senses which way you are facing and turns it into a number your code can read, from 0 all the way round to 359. North is 0, east is 90, south is 180 and west is 270.
Real-world example: Like the little arrow on a map app that swings round as you turn, a compass tells your code which way you are pointing.
LED Matrix
The LED matrix is the grid of little red lights on the front of the micro:bit. By switching them on and off in patterns, your code can show numbers, letters and tiny pictures.
Real-world example: Like a mini scoreboard made of dots, the LED matrix lights up to spell out your step count.
Variable
A variable is something that can change. Think of it like a labelled box: you pop something inside, and the label tells you what it is. You can swap what's inside whenever you like.
Real-world example: A variable called score might start at 0, then change to 1, 2 and 3 as you collect points in a game.
If statement
An if statement checks whether something is true, and only runs its instructions when it is. It's how code makes decisions.
Real-world example: "If it's cold, put on a coat." If it's warm, you skip the coat, the action only happens when the check is true.
Comparison Operators
A comparison operator checks how two things measure up, for example whether they are equal or one is bigger than the other. It gives back a simple true or false answer.
Real-world example: Asking "is 6 == 6?" gives back true, but "is 6 == 2?" gives back false, so your code knows whether the two numbers match.
Set up EduBlocks
First, let’s create a new EduBlocks project.
- Open your favourite web browser. Google Chrome or Microsoft Edge works well.
- Go to app.edublocks.org.
- Find Create New Project.
- Select micro:bit.
- Name your project Environment Detective.
- Make sure Blocks is selected as the project type.
- Select Create.
The EduBlocks micro:bit editor will now open.
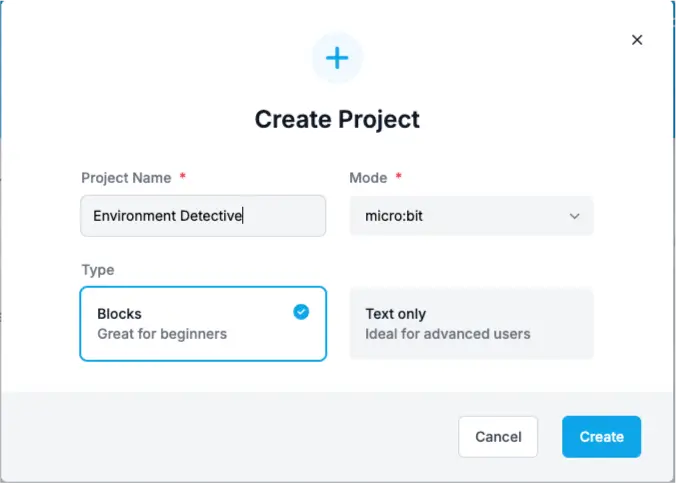
EduBlocks lets you build Python code using colourful blocks. The blocks snap together and help you see how the finished Python code is organised.
Prepare the code area
We need to import the micro:bit tools, prepare the compass and add a loop that keeps checking the sensors.
- Open Basic.
- Select Imports.
- Drag a
from microbit import *block onto the# Start code hereblock. - Open Compass.
- Drag a
compass.calibrate()block underneath the import block. - Open Basic.
- Select Loops.
- Drag a
while True:block underneathcompass.calibrate().
Your starting code should look like this:
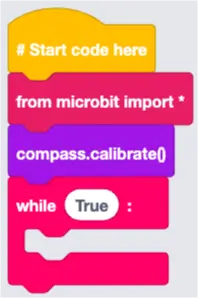
The while True: block creates a loop. Everything placed inside it will keep running while the micro:bit is switched on.
Sense the temperature
First, we will make the micro:bit display the temperature when you shake it.
- Open Basic.
- Select Logic.
- Drag an
if True:block inside thewhile True:block. - Open Accelerometer.
- Drag
accelerometer.was_gesture("shake")onto theTruesection of theifblock. - Open Display.
- Drag
display.scroll(0)inside the shake block. - Change the
0totemperature(). - Open Basic.
- Select Statements.
- Add
sleep(1000)underneathdisplay.scroll(temperature()). - Change
1000to2000. - Open Display.
- Add
display.clear()underneathsleep(2000).
Your code should look like this:
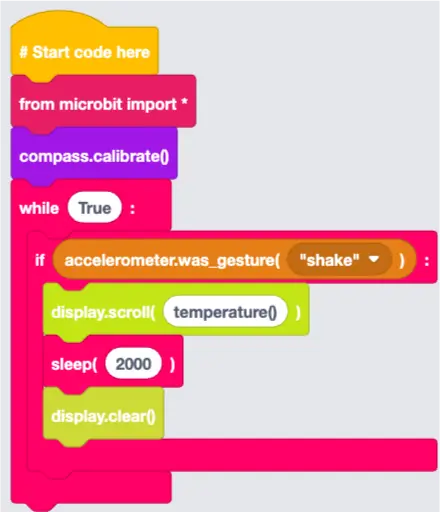
Here’s what this bit of code is doing:
- The micro:bit waits until it detects a shake.
- It reads the temperature.
- It scrolls the temperature across the LED matrix.
- It waits for two seconds.
- It clears the display.
The micro:bit displays temperature in degrees Celsius.
Sense the light level
Next, we will use button A to check whether the room is dark.
- Open Basic.
- Select Logic.
- Add another
if True:block underneath the whole temperature section. - Open Buttons.
- Drag
button_a.was_pressed()onto theTruesection. - Add another
if True:block inside the button A block. - Open Basic, then Logic.
- Drag a
0 == 0comparison ontoTrue. - Change
==to<. - Add
display.read_light_level()before the<symbol. - Change the second
0to100.
Your comparison should now say:
display.read_light_level() < 100
Show a picture when it is dark
- Open Display.
- Add
display.show(10)inside the light-level check. - Add an
Image.HEARTblock to replace10. - Change
HEARTtoHAPPY. - Open Basic, then Logic.
- Add an
else:block underneath the light-level check. - Open Display.
- Add
display.clear()insideelse:. - Open Basic, then Statements.
- Add
sleep(1000)underneath the light section. - Change
1000to500.
Your light-sensing code should look like this:
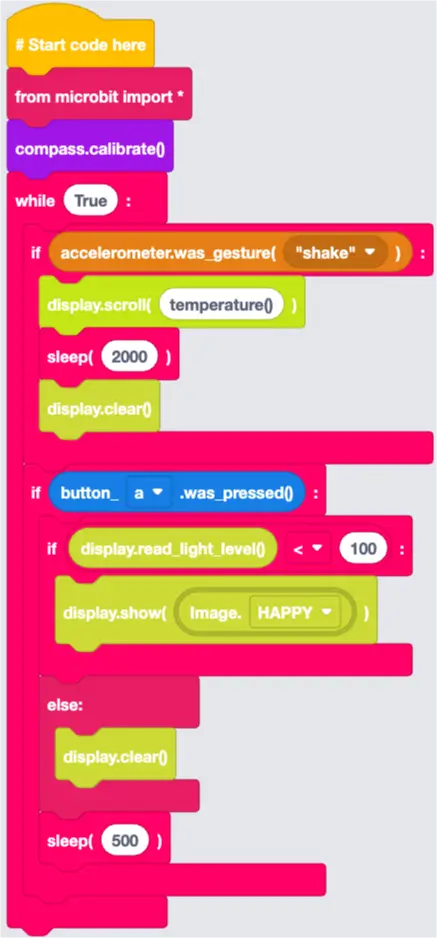
When you press button A:
- The micro:bit checks the light level.
- If the light level is below
100, it shows a happy face. - If the light level is
100or higher, it clears the display.
The code uses an If statementAn if statement checks whether something is true, and only runs its instructions when it is. It's how code makes decisions.Full entry → and a Comparison OperatorsA comparison operator checks how two things measure up, for example whether they are equal or one is bigger than the other. It gives back a simple true or false answer.Full entry → to make this decision.
Cover the micro:bit with your hand and press button A. Then move it somewhere brighter and try again.
Build the compass code
Now we will use button B to display the compass direction as a number.
- Open Basic.
- Select Logic.
- Add another
if True:block underneath the whole button A section. - Open Buttons.
- Drag
button_b.was_pressed()ontoTrue. - Open Display.
- Add
display.scroll(0)inside the button B block. - Open Compass.
- Drag
compass.heading()onto the0. - Open Basic, then Statements.
- Add
sleep(1000)underneath the display block. - Change
1000to500.
Your code should look like this:
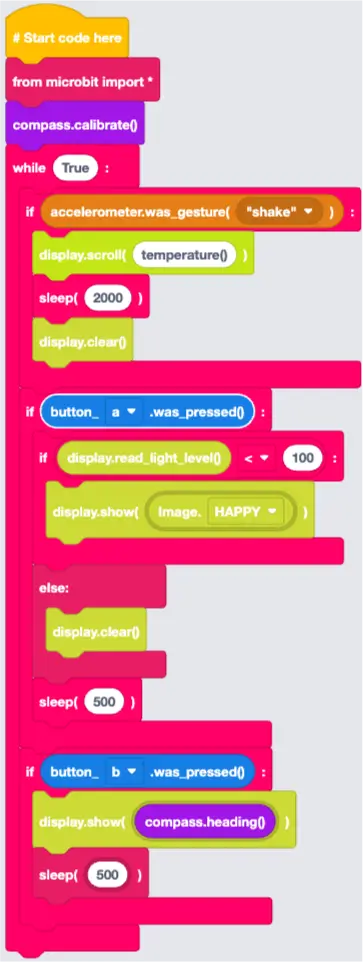
When you press button B, the micro:bit will display a number between 0 and 359.
| Direction | Compass heading |
|---|---|
| North | 0 |
| East | 90 |
| South | 180 |
| West | 270 |
The compass works like a circle. After 359 degrees, it returns to 0 degrees.
Show compass letters
Numbers are useful, but letters are easier to recognise quickly.
We will now create a second button B section that shows N, E, S or W.
Create the direction variable
- Add another
if True:block underneath the compass-number section. - Open Buttons.
- Add
button_b.was_pressed()to theTruesection. - Open Variables.
- Select Create a Variable.
- Name the variable
direction. - Add
direction = 0inside the button B block. - Open Compass.
- Replace
0withcompass.heading().
The block should now say:
direction = compass.heading()
A VariableA variable is something that can change. Think of it like a labelled box: you pop something inside, and the label tells you what it is. You can swap what's inside whenever you like.Full entry → stores information that can change. In this project, the direction variable stores the current compass heading.
Add the north check
- Open Basic, then Logic.
- Add an
if True:block underneathdirection = compass.heading(). - Add a
True and Trueblock ontoTrue. - Change
andtoor. - Add a comparison block to the first
True. - Build the comparison
direction > 315. - Add another comparison to the second
True. - Build the comparison
direction < 45. - Open Display.
- Add
display.show("Hello")inside theifblock. - Change
HellotoN.
The first check should now say:
if direction > 315 or direction < 45:
Add east
- Open Basic, then Logic.
- Add an
elif True:block underneath the north section. - Build the comparison
direction < 135. - Add
display.show("Hello")inside it. - Change
HellotoE.
Add south
- Add another
elif True:block. - Build the comparison
direction < 225. - Add
display.show("Hello")inside it. - Change
HellotoS.
Add west
- Add an
else:block underneath the south section. - Add
display.show("Hello")inside it. - Change
HellotoW. - Add
sleep(500)underneath the completed compass section.
Your finished compass code should look like this:
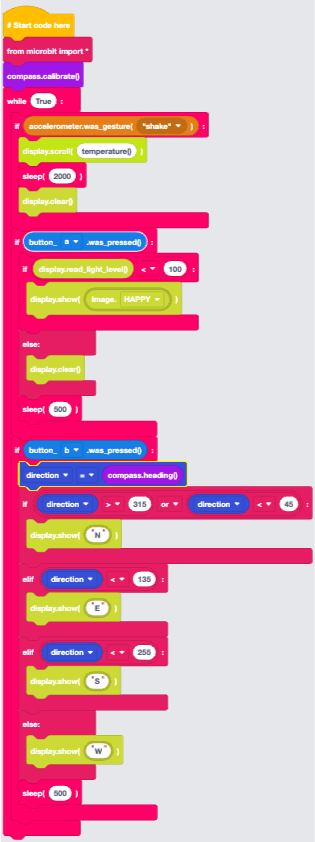
How your code decides
Imagine the compass is a pizza cut into four slices. The code checks which slice the compass number has landed in, then shows the letter for that direction.
Download your code
Your environment detector is ready to transfer to the micro:bit.
- Connect the micro:bit to your computer using the micro USB cable.
- In EduBlocks, select Connect.
- Follow the instructions on the screen to pair your micro:bit.
- If your browser asks for permission, choose the micro:bit from the list.
- Select Connect.
- Select Flash to send the code to the micro:bit.
If EduBlocks cannot find the micro:bit, try another USB cable. Some cables can only charge devices and cannot transfer code.
Test your environment detector
When the micro:bit first starts, it may ask you to tilt it in different directions until all the LEDs have lit up.
This is called calibrating. It helps the compass work out which direction is north.
Test the temperature
- Shake the micro:bit.
- Watch the temperature scroll across the LED matrix.
- Move to a different room or go outside and try again.
Test the light level
- Cover the micro:bit with your hand.
- Press button A.
- A happy face should appear if the light level is below
100. - Move the micro:bit somewhere brighter and press button A again.
Test the compass
- Face one direction.
- Press button B.
- Look at the letter on the LED matrix.
- Turn around and press button B again.
You should see N, E, S or W, depending on which direction the micro:bit is facing.
If the compass gives an unexpected answer, calibrate it again and move away from large metal objects or magnets.
Try it yourself
Challenge: Build an environment warning system
Can you make the micro:bit warn you when the room gets too cold?
Inside the if accelerometer.was_gesture("shake"): section, add another if block.
Make it check whether temperature() is below a number you choose, such as 15.
If it is too cold, make the micro:bit show:
- A sad face
- A snowflake
- A warning picture of your own
Can you create another warning for the light sensor?
Try changing the button A code so the micro:bit shows a warning picture when the room gets too dark.
Stuck? Quick fixes
| Problem | Try this |
|---|---|
| Nothing happens when I shake the micro:bit | Check that display.scroll(temperature()) is inside if accelerometer.was_gesture("shake"):. Give the micro:bit one firm, clear shake. |
| The temperature looks too warm | This is normal. The sensor is on the micro:bit itself, so it can warm up after the board has been switched on or held in your hand. |
| The happy face does not appear | Cover the micro:bit with your hand. Check that your comparison says display.read_light_level() < 100. |
| Button B shows the wrong direction | Complete the compass calibration by tilting the micro:bit until every LED has lit up. |
| The compass always shows W | Check the numbers in your comparisons: 315 and 45 for north, 135 for east and 225 for south. |
| I cannot find a block | Check the correct category: Basic, Display, Buttons, Accelerometer, Compass, Logic, Variables or Statements. |
| My code will not download | Try another USB cable or USB socket. Check that the micro:bit is paired with EduBlocks. |
Don’t worry if it doesn’t work first time. That’s how coding works! Check one block at a time and compare it with the pictures.