
Overview
Ever wondered how a smartwatch or fitness band counts your steps? In this project, you're going to build your very own step counter using a micro:bitThe micro:bit is a tiny programmable computer, about the size of a matchbox, made for learning to code. It has two buttons, a grid of little red LED lights and built-in sensors that can detect movement, light and temperature.Full entry →!
Inside your micro:bit is a clever little sensor called an AccelerometerAn accelerometer is a tiny part inside the micro:bit that senses movement, like tilting, shaking or being turned over. It turns that movement into numbers your code can react to.Full entry →. It can feel when the micro:bit moves. We'll use it to spot every step you take, add them up, and show the total on the LED MatrixThe LED matrix is the grid of little red lights on the front of the micro:bit. By switching them on and off in patterns, your code can show numbers, letters and tiny pictures.Full entry → (the grid of lights on the front).
The best bit? When you're done, you'll have a real working fitness tracker you can pop on and take outside. Don't worry if something doesn't work first time, that's all part of coding. Let's give it a go!
What you'll learn
- Make and use your own VariableA variable is something that can change. Think of it like a labelled box: you pop something inside, and the label tells you what it is. You can swap what's inside whenever you like.Full entry →
- Use the micro:bit's shake sensor to spot movement
- Show a number on the grid of lights
- Use the buttons to control your project
- Use a While loopA while loop keeps repeating its instructions for as long as something stays true. The moment that thing stops being true, the loop stops.Full entry →
- Make decisions with If statementAn if statement checks whether something is true, and only runs its instructions when it is. It's how code makes decisions.Full entry →s
What you'll need
- The micro:bit EduBlocks editor
- micro:bit
- micro USB cable
- battery pack for the micro:bit (optional)
Key words
Variable
A variable is something that can change. Think of it like a labelled box: you pop something inside, and the label tells you what it is. You can swap what's inside whenever you like.
Real-world example: A variable called score might start at 0, then change to 1, 2 and 3 as you collect points in a game.
While loop
A while loop keeps repeating its instructions for as long as something stays true. The moment that thing stops being true, the loop stops.
Real-world example: "While it's still raining, keep the umbrella up." As soon as the rain stops, you put the umbrella down, and the loop ends.
If statement
An if statement checks whether something is true, and only runs its instructions when it is. It's how code makes decisions.
Real-world example: "If it's cold, put on a coat." If it's warm, you skip the coat, the action only happens when the check is true.
Accelerometer
An accelerometer is a tiny part inside the micro:bit that senses movement, like tilting, shaking or being turned over. It turns that movement into numbers your code can react to.
Real-world example: A bit like the sensor in a games controller that knows when you tilt it to steer, the accelerometer notices when the micro:bit moves.
LED Matrix
The LED matrix is the grid of little red lights on the front of the micro:bit. By switching them on and off in patterns, your code can show numbers, letters and tiny pictures.
Real-world example: Like a mini scoreboard made of dots, the LED matrix lights up to spell out your step count.
Button
A button is a switch you press to tell your project to do something. The code can check whether it's being pressed or not.
Real-world example: Pressing a doorbell is just like pressing a button, one press sends a signal that makes something happen.
Set up your micro:bit EduBlocks Editor
- Open your web browser. We recommend Google Chrome or Microsoft Edge.
- In the address bar type app.edublocks.org.
- Under Create New Project, select micro:bit. Name your project MicroFit, and make sure block is selected under type.
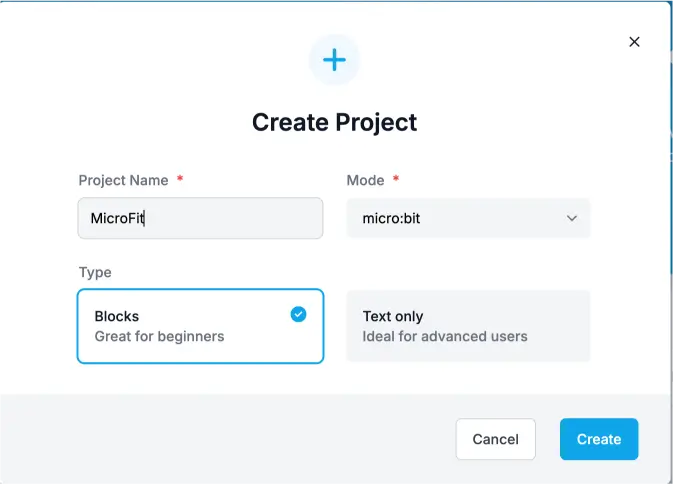
- Select Create to open the micro:bit editor.
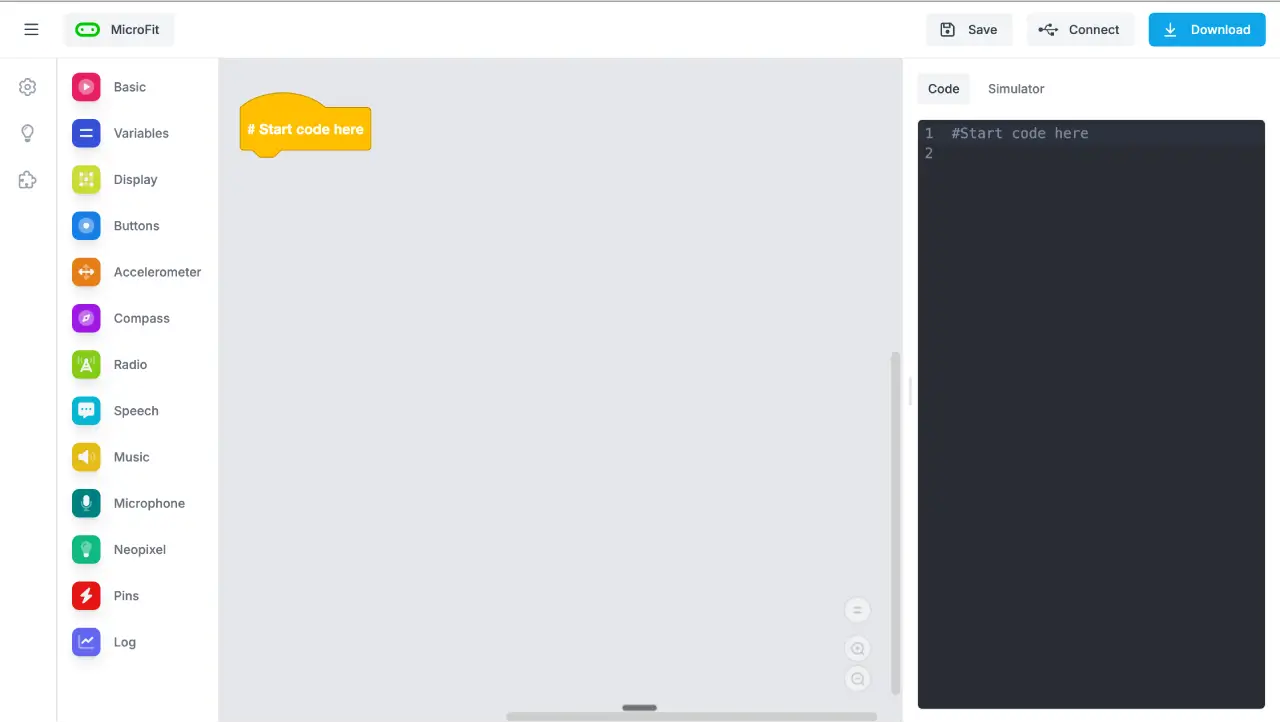
Import the MicroPython library
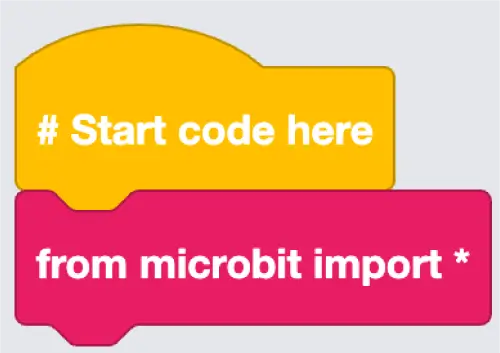
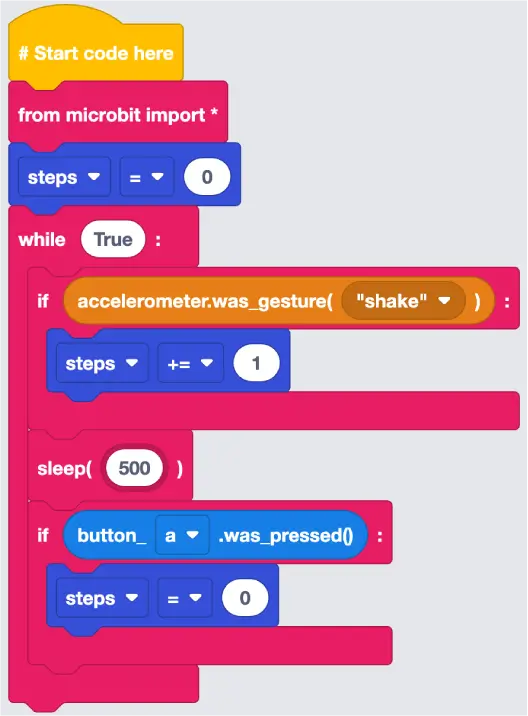
Select Basic, then Imports, then snap a from microbit import * block onto the #start code here block.
This imports the micro:bit library into EduBlocks so we can use all the micro:bit's functions.
Set steps to 0
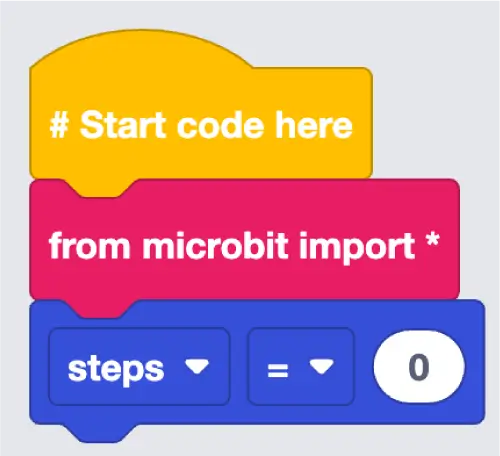
- Select Variables, choose Create a Variable, and name it steps.
- Snap a
steps = 0block to thefrom microbit import *block.
This makes a VariableA variable is something that can change. Think of it like a labelled box: you pop something inside, and the label tells you what it is. You can swap what's inside whenever you like.Full entry → called steps and starts it at zero.
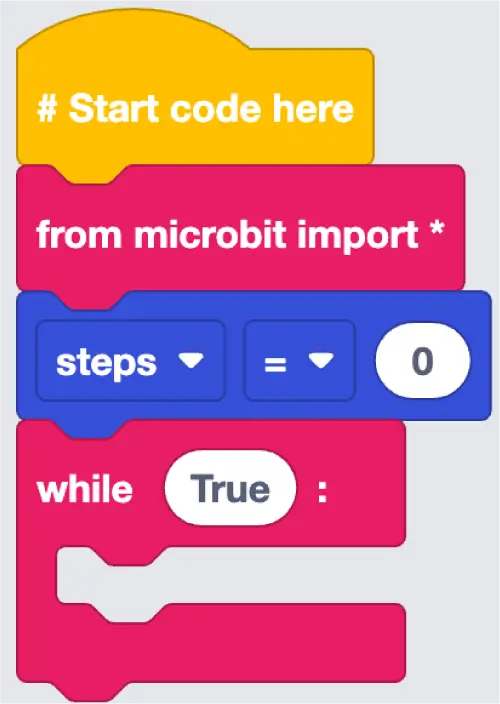
Create a while True loop
Select Basic, then Loops, then snap a while True: block onto the steps = 0 block.
This While loopA while loop keeps repeating its instructions for as long as something stays true. The moment that thing stops being true, the loop stops.Full entry → gives us a space to put code that repeats forever.
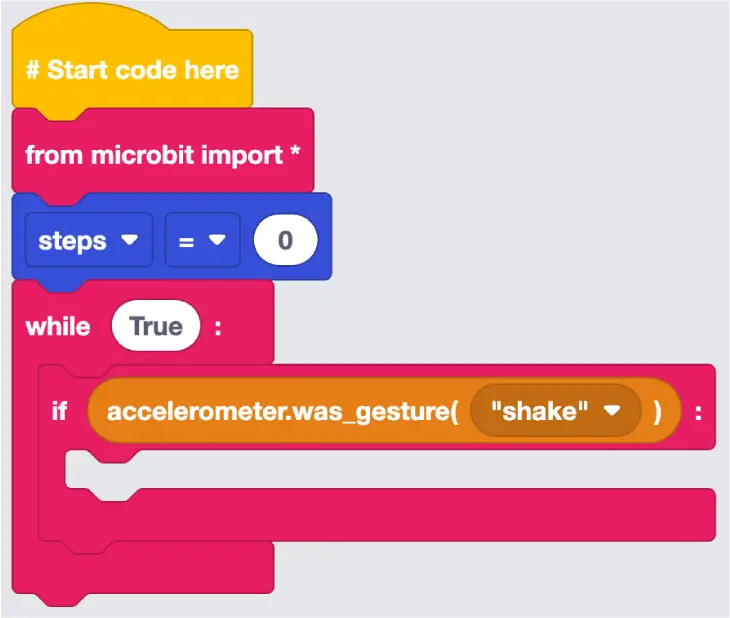
Detect a shake
- Select Basic, then Logic, then drag an
if True:block inside thewhile True:block. - Select Accelerometer, then snap an
accelerometer.was_gesture("shake")block onto theifblock where it says True.
This If statementAn if statement checks whether something is true, and only runs its instructions when it is. It's how code makes decisions.Full entry → runs its code only when the micro:bit feels a shake.
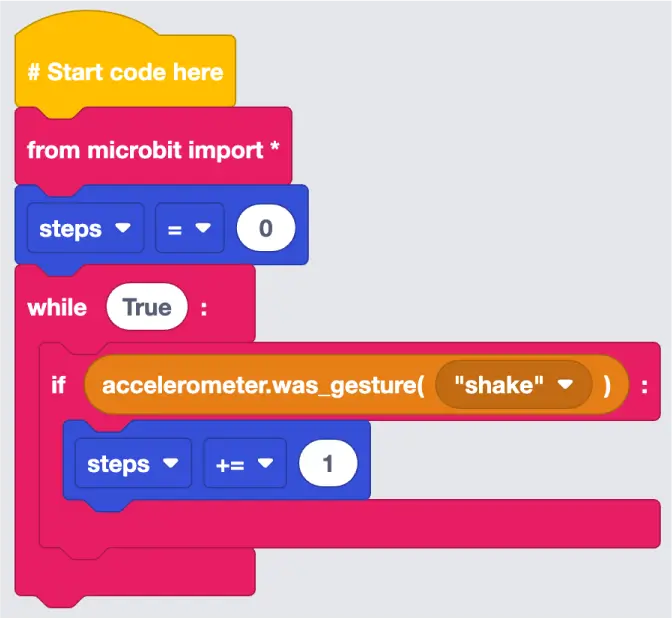
Increase the steps
- Select Variables, then snap a
steps = 0block inside theif accelerometer.was_gesture("shake"):block. - Change the = to += and the 0 to 1.
Now every detected shake adds one to your step count.
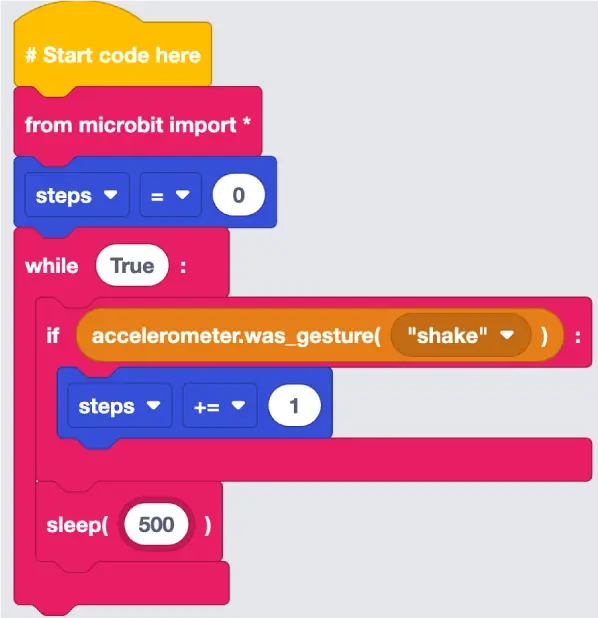
Pause the code
Select Basic, then Statements, then snap a sleep (1000) block below the if accelerometer.was_gesture("shake"): block, lined up with the if (inside the while True: loop, but not inside the if). Change 1000 to 500.
This pauses for half a second so the loop has time to notice the button press we'll add next.
Reset the steps with button A
- Select Basic, then Logic, then snap an
if True:block onto thesleep (500)block. - Select Buttons, then snap a
button_a.was_pressed()block onto theifblock where it says True. - Select Variables, then snap a
steps = 0block inside theif button_a.was_pressed():block.
Pressing ButtonA button is a switch you press to tell your project to do something. The code can check whether it's being pressed or not.Full entry → A now resets your step count back to zero.
Show the number of steps
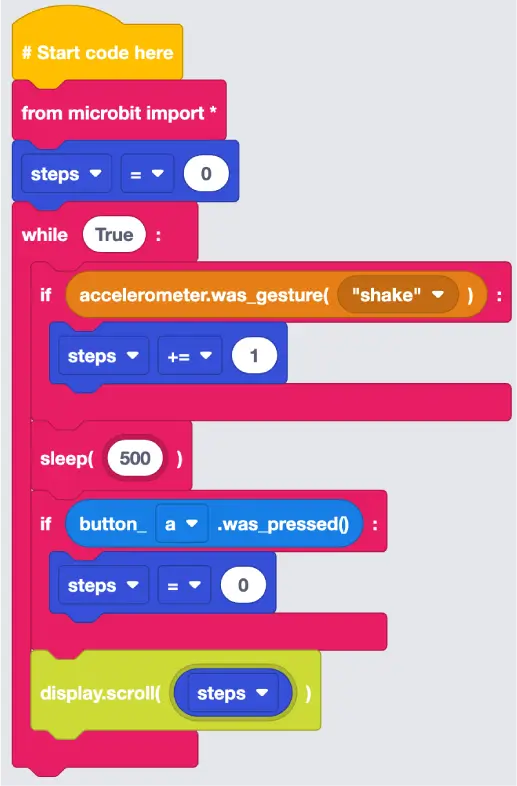
- Select Display, then snap a
display.scroll ("Hello World")block just below theif button_a.was_pressed():block. - Select Variables, then snap a
stepsblock onto thedisplay.scrollblock, over the words "Hello World".
This block sits inside the loop but not inside the button A block, so your steps scroll across the LED MatrixThe LED matrix is the grid of little red lights on the front of the micro:bit. By switching them on and off in patterns, your code can show numbers, letters and tiny pictures.Full entry → all the time, not just when you press A.
Downloading the Code
- Connect the micro:bit to the computer with the micro USB cable.
- Select Connect and follow the on-screen prompts to pair the micro:bit with your web browser.
- Select Download to send the code to your micro:bit.
Run it and Watch
In the web browser
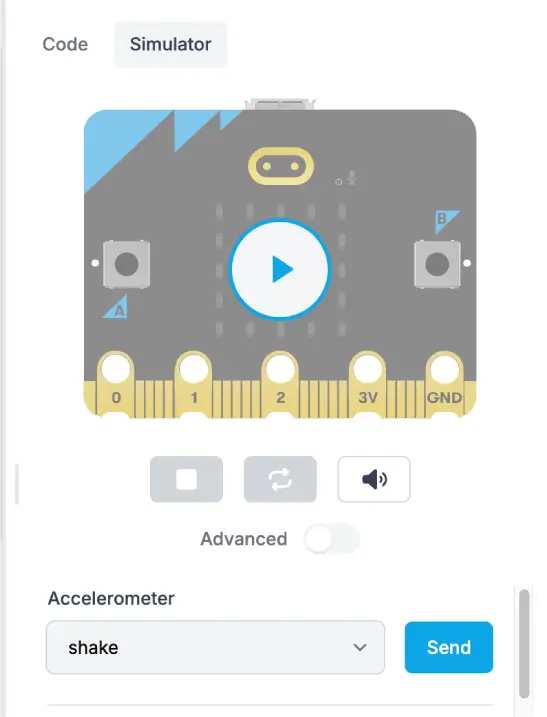
EduBlocks has a built-in micro:bit simulator, handy if you haven't got a micro:bit to hand.
- On the right-hand side of the screen, select Simulator.
- From the accelerometer menu below the simulator, select Shake.
- Select Send. This simulates a shake and shows a number on the simulated micro:bit.
On a real micro:bit
Once your code's downloaded, give the micro:bit a shake. Each shake bumps your step count up by one on the LED matrix. Pop a battery pack on, attach it to your wrist or ankle, and head outside to watch your steps climb.
Try it yourself
Challenge: Set yourself a step goal! Add another if block inside your while True: loop that checks when steps >= 20. When you hit it, use a display.show block to show a happy face to celebrate, then press button A to reset and go again.
Stuck? Quick fixes
| Problem | Try this |
|---|---|
| The number doesn't go up when I shake it | Check your steps += 1 block is inside the if accelerometer.was_gesture("shake"): block. Give the micro:bit one firm, clear shake. |
| The count jumps up by lots at once | A big wobble can look like several shakes. Try one single, definite shake, and check the sleep(500) block is inside your while True: loop so each shake has time to register. |
| Nothing shows on the LED matrix | Make sure the steps block is inside the display.scroll block (in place of "Hello World"), and that display.scroll is inside your while True: loop. |
| Button A won't reset the steps | Check the steps = 0 block is inside the if button_a.was_pressed(): block. |
| The number doesn't update while I keep shaking | Don't worry, it's still counting! The micro:bit can't show the new number while it's busy scrolling the last one. Stop shaking for a moment and the latest total will scroll across. |
| My code won't download to the micro:bit | Use a data USB cable (not a charge-only one), make sure the micro:bit is paired, and try a different USB port. |