
Overview
Can you beat a micro:bit at rock, paper, scissors? In this project you're going to find out, by coding your very own game on a micro:bitThe micro:bit is a tiny programmable computer, about the size of a matchbox, made for learning to code. It has two buttons, a grid of little red LED lights and built-in sensors that can detect movement, light and temperature.Full entry →!
Give your micro:bit a shake and the AccelerometerAn accelerometer is a tiny part inside the micro:bit that senses movement, like tilting, shaking or being turned over. It turns that movement into numbers your code can react to.Full entry → inside it feels the movement. Your code then picks rock, paper or scissors at RandomRandom means you can't guess what's coming next, a bit like rolling a dice. The computer picks for you, so you get a different surprise each time.Full entry → and shows it as a little picture on the LED MatrixThe LED matrix is the grid of little red lights on the front of the micro:bit. By switching them on and off in patterns, your code can show numbers, letters and tiny pictures.Full entry → (the grid of lights on the front), so you can see straight away whether you've won.
The best bit? When you're done you'll have a real game you can play against your micro:bit, or challenge a friend. Don't worry if something doesn't work first time, that's all part of coding. Let's give it a go!
What you'll learn
- Bring in a ready-made library with Importing LibrariesA library is a ready-made bundle of code that someone else has written for you. Importing a library means bringing it into your project so you can use all its ready-made commands and features, without building them from scratch.Full entry →
- Use a While loopA while loop keeps repeating its instructions for as long as something stays true. The moment that thing stops being true, the loop stops.Full entry → to keep your game running
- Make and use your own VariableA variable is something that can change. Think of it like a labelled box: you pop something inside, and the label tells you what it is. You can swap what's inside whenever you like.Full entry →
- Use the micro:bit's shake sensor to spot movement
- Draw your own pictures on the grid of lights
- Make decisions with If statementAn if statement checks whether something is true, and only runs its instructions when it is. It's how code makes decisions.Full entry →s, plus elif and else
- Compare two things with a Comparison OperatorsA comparison operator checks how two things measure up, for example whether they are equal or one is bigger than the other. It gives back a simple true or false answer.Full entry →
- Let the micro:bit choose at RandomRandom means you can't guess what's coming next, a bit like rolling a dice. The computer picks for you, so you get a different surprise each time.Full entry →
What you'll need
- The micro:bit Python editor
- micro:bit
- micro USB cable
- battery pack for the micro:bit (optional)
Key words
Importing Libraries
A library is a ready-made bundle of code that someone else has written for you. Importing a library means bringing it into your project so you can use all its ready-made commands and features, without building them from scratch.
Real-world example: It's like borrowing a recipe book from the library. Instead of working out every recipe yourself, you bring the book in and use the recipes whenever you need them.
Variable
A variable is something that can change. Think of it like a labelled box: you pop something inside, and the label tells you what it is. You can swap what's inside whenever you like.
Real-world example: A variable called score might start at 0, then change to 1, 2 and 3 as you collect points in a game.
While loop
A while loop keeps repeating its instructions for as long as something stays true. The moment that thing stops being true, the loop stops.
Real-world example: "While it's still raining, keep the umbrella up." As soon as the rain stops, you put the umbrella down, and the loop ends.
Accelerometer
An accelerometer is a tiny part inside the micro:bit that senses movement, like tilting, shaking or being turned over. It turns that movement into numbers your code can react to.
Real-world example: A bit like the sensor in a games controller that knows when you tilt it to steer, the accelerometer notices when the micro:bit moves.
Random
Random means you can't guess what's coming next, a bit like rolling a dice. The computer picks for you, so you get a different surprise each time.
Real-world example: Asking a computer for a random number between 1 and 6 is just like rolling a dice, you never know if you'll get a 1 or a 6.
If statement
An if statement checks whether something is true, and only runs its instructions when it is. It's how code makes decisions.
Real-world example: "If it's cold, put on a coat." If it's warm, you skip the coat, the action only happens when the check is true.
Comparison Operators
A comparison operator checks how two things measure up, for example whether they are equal or one is bigger than the other. It gives back a simple true or false answer.
Real-world example: Asking "is 6 == 6?" gives back true, but "is 6 == 2?" gives back false, so your code knows whether the two numbers match.
LED Matrix
The LED matrix is the grid of little red lights on the front of the micro:bit. By switching them on and off in patterns, your code can show numbers, letters and tiny pictures.
Real-world example: Like a mini scoreboard made of dots, the LED matrix lights up to spell out your step count.
Set up your micro:bit Python Editor
- Open your web browser. We recommend Google Chrome or Microsoft Edge.
- In the address bar type python.microbit.org.
- Give your project a name: select the project name box at the top of the editor and type Rock Paper Scissors.
- Close the left-hand panel by selecting the arrow pointing to the left.
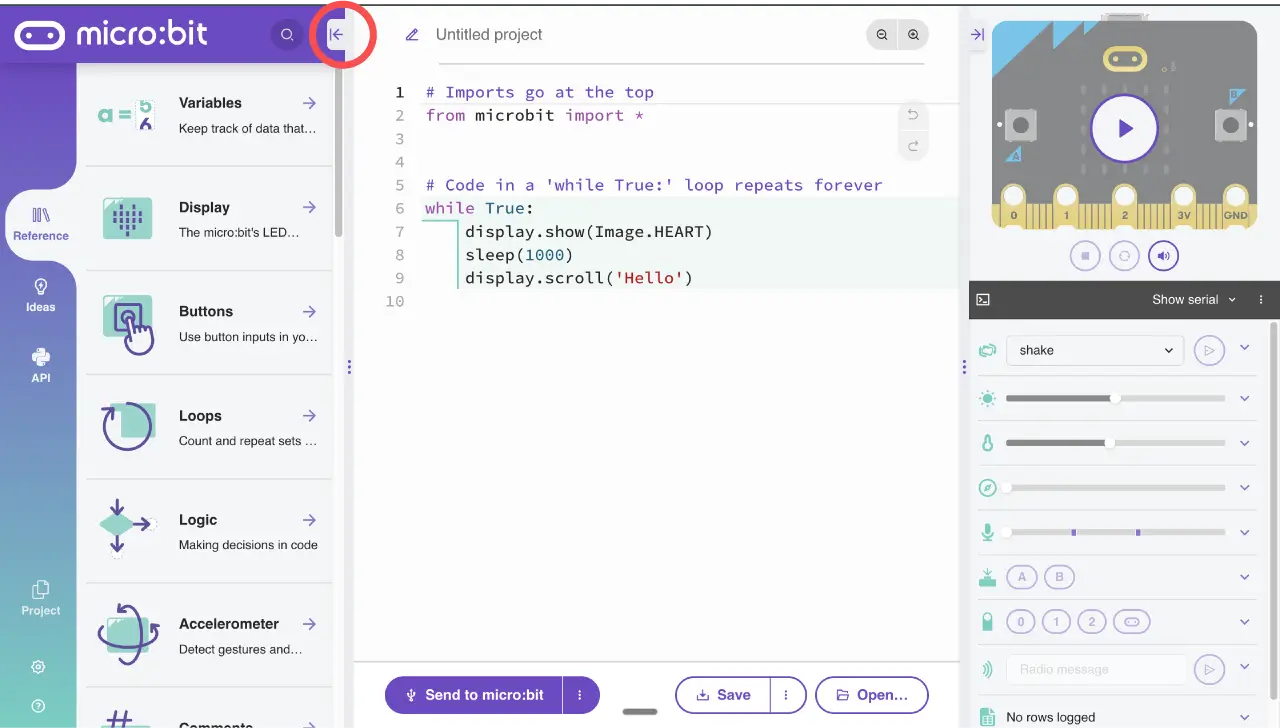
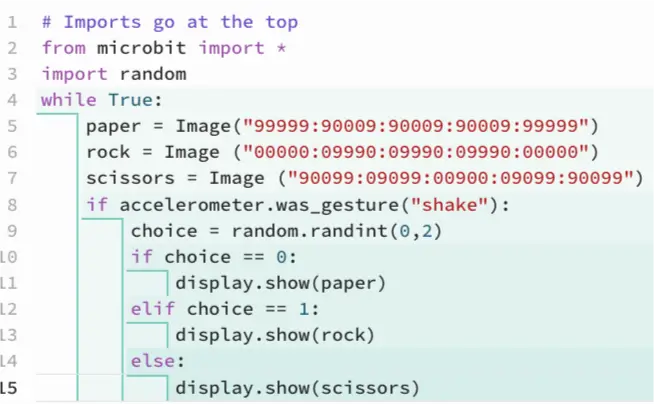
- Delete the code on lines 5 to 9 in the main code area.
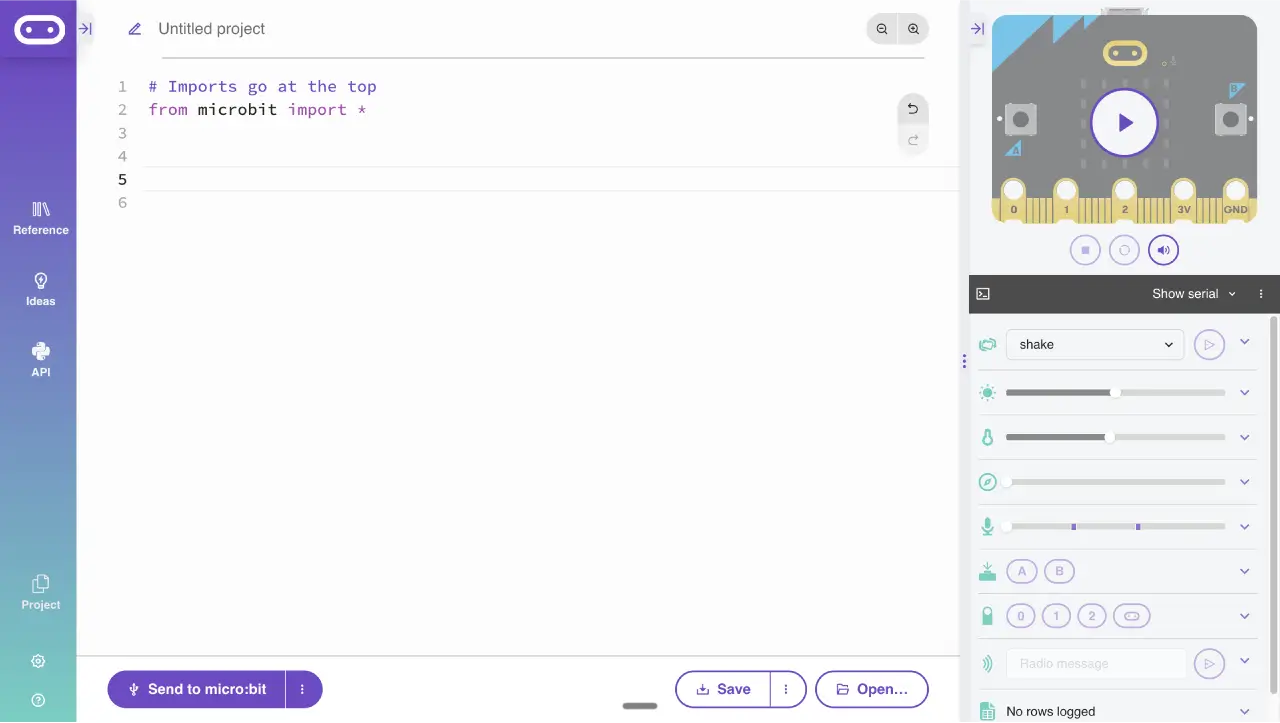
Import the random library
On line 3, type import random. This is Importing LibrariesA library is a ready-made bundle of code that someone else has written for you. Importing a library means bringing it into your project so you can use all its ready-made commands and features, without building them from scratch.Full entry →, and it brings in the random library so the micro:bit can pick for itself later on.
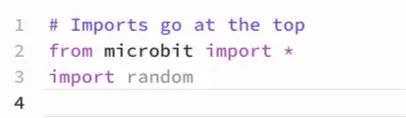
Create a while True loop
Type while True: and press Enter. This creates a While loopA while loop keeps repeating its instructions for as long as something stays true. The moment that thing stops being true, the loop stops.Full entry →, so anything inside it runs while the condition stays true. Python needs the capital T in True and the colon at the end, or the code won't run. Notice your cursor automatically indents, that's how Python shows what's inside the loop.
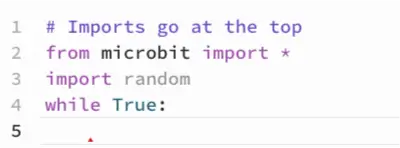
Create the picture variables
Each of these makes a VariableA variable is something that can change. Think of it like a labelled box: you pop something inside, and the label tells you what it is. You can swap what's inside whenever you like.Full entry → holding one of your pictures.
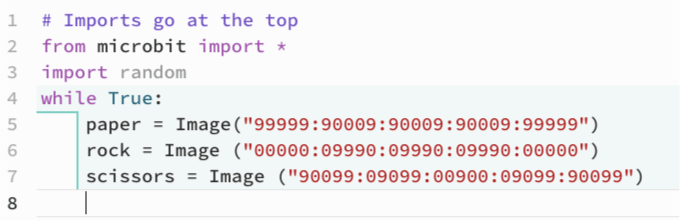
- Type
paper = Image("99999:90009:90009:90009:99999")to create the paper icon. - Type
rock = Image("00000:09990:09990:09990:00000")to create the rock icon. - Type
scissors = Image("90099:09099:00900:09099:90099")to create the scissors icon.
The 9s are the lights that switch on and the 0s are the lights that stay off, so each row of numbers draws one row of the grid.
Detect a shake
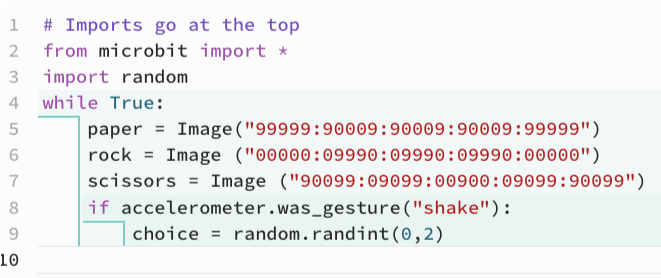
- Type
if accelerometer.was_gesture("shake"):and press Enter. Keep it lined up with your picture variables. This If statementAn if statement checks whether something is true, and only runs its instructions when it is. It's how code makes decisions.Full entry → checks whether the micro:bit has been shaken. - Type
choice = random.randint(0, 2)and press Enter. This creates a choice variable and sets it to a RandomRandom means you can't guess what's coming next, a bit like rolling a dice. The computer picks for you, so you get a different surprise each time.Full entry → whole number between 0 and 2.
Show paper with an if statement
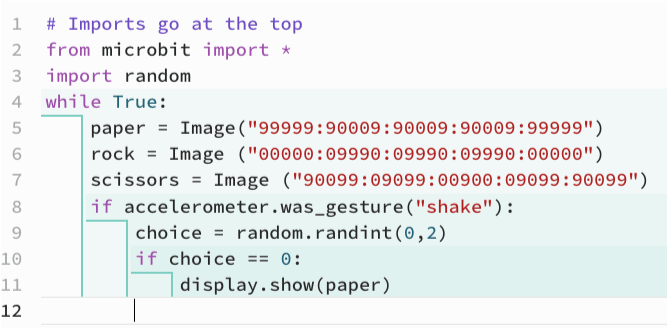
- Type
if choice == 0:and press Enter. The==is a , and it checks whether the two things match. - Type
display.show(paper)and press Enter. - Delete the indent so your cursor lines back up with the
if choice == 0:line.
Now, when choice is 0, the paper icon appears on the LED MatrixThe LED matrix is the grid of little red lights on the front of the micro:bit. By switching them on and off in patterns, your code can show numbers, letters and tiny pictures.Full entry →.
Show rock with an elif statement
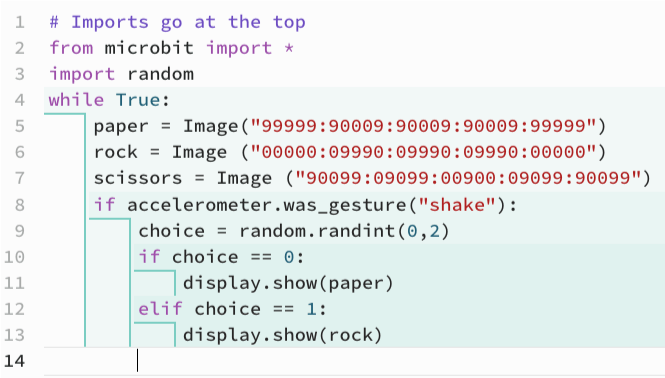
- Type
elif choice == 1:and press Enter.elifis short for "else if", so this is the next check to try. - Type
display.show(rock)and press Enter. - Delete the indent so your cursor lines back up with the
elif choice == 1:line.
Now, when choice is 1, the rock icon appears instead.
Show scissors with an else statement
- Type
else:and press Enter. - Type
display.show(scissors).
else is the catch-all, so if choice isn't 0 or 1 it must be 2, and the scissors icon appears.
Downloading Your Code
- Connect the micro:bit to the computer with the micro USB cable.
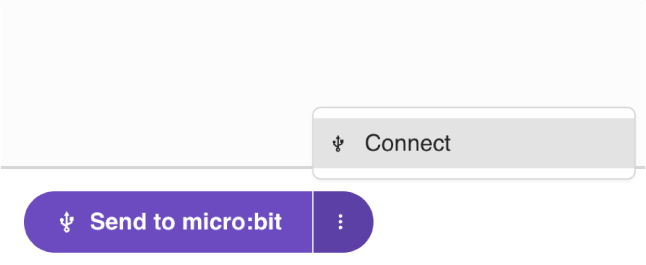
- Select the three dots next to Send to micro:bit.
- Select Connect and follow the on-screen prompts.
- Select Send to micro:bit to download the code.
Run it and Play
In the web browser
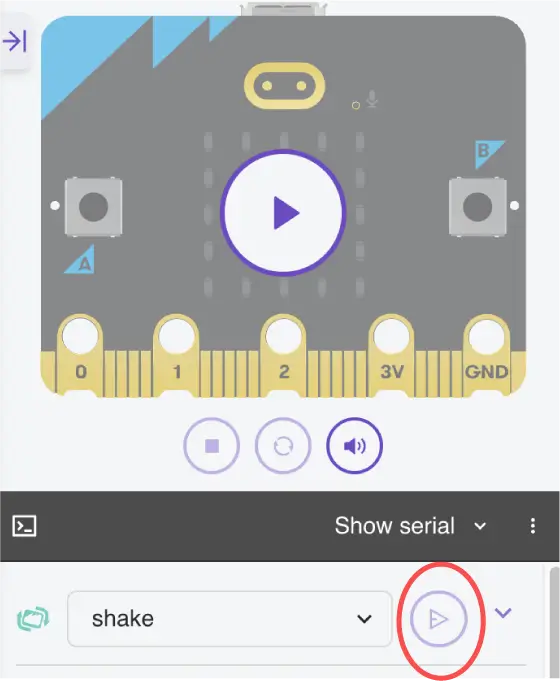
The Python editor has a built-in micro:bit simulator, handy if you haven't got a micro:bit to hand. Below the simulator you'll see the shake function is already selected. Select the play button next to it to simulate a shake and watch paper, rock or scissors appear on the LED matrix.
On a real micro:bit
Once your code's downloaded, give the micro:bit a shake and see what it picks. Remember the choice is random, so you might get the same icon twice in a row, that's completely normal. Why not find a friend and see who can beat the micro:bit?
Try it yourself
Challenge: Give your micro:bit a voice! Add an audio.play(Sound.HAPPY) line inside your if accelerometer.was_gesture("shake"): check, just after you set the choice, so it beeps every time it plays. For an extra challenge, pick a different sound for rock, paper and scissors.
Good to know: the sound plays through the built-in speaker, which only the micro:bit V2 has. If you've got a V1, you can still try this by clipping a buzzer or headphones to the pins. Everything else in this project works happily on both.
Stuck? Quick fixes
| Problem | Try this |
|---|---|
| Nothing happens when I shake it | Give the micro:bit one firm, clear shake, not too gentle. Also check your code is indented inside the if accelerometer.was_gesture("shake"): line. |
| The same icon keeps showing | That's okay, it's working! The choice is random, so shake a few more times and the others will turn up. |
| My icons look wrong or blank | Check each Image("...") line and make sure the 9s and 0s match the pattern for rock, paper and scissors, with a colon between each row. |
| It only ever shows two icons | Check your elif is set to choice == 1, and that random.randint goes from 0 to 2. |
I get an error about random | Check import random is on its own line at the top, above your while True: loop, and spelled all in lower case. |
| My code won't download to the micro:bit | Use a data USB cable (not a charge-only one), make sure the micro:bit is paired, and try a different USB port. |