
Overview
Let's turn PicoBricks into a mini music player! 🎵
In this project you'll code the BuzzerA buzzer is a tiny speaker that makes beeps and tones when you send it electricity. By telling it different numbers, you can make it play notes and tunes.Full entry → to play a tune, use the PotentiometerA potentiometer is a knob or dial that controls how much electricity flows through a circuit. Think of it like a tap for water: turn it one way and more comes out, turn it the other way and less comes out.Full entry → to change how fast the music plays, and press a ButtonA button is a switch you press to tell your project to do something. The code can check whether it's being pressed or not.Full entry → to start the song.
Music is made of notes. Each note has its own special number called a FrequencyA frequency is just a number that tells a buzzer which note to play. A small number makes a low sound, and a big number makes a high sound.Full entry →. If we tell the buzzer the right numbers, in the right order, it can play any song we like!
What you'll learn
- How to make a buzzer play musical notes
- How to use a potentiometer (dial) to control speed
- How to use a button to start your music
- How to create and use variables
What you'll need
- PicoBricks Kit
- PicoBricks Brick IDE
- MicroUSB to USB cable
- Laptop or tablet for coding
Key words
Potentiometer
A potentiometer is a knob or dial that controls how much electricity flows through a circuit. Think of it like a tap for water: turn it one way and more comes out, turn it the other way and less comes out.
Real-world example: A volume dial on a speaker is a potentiometer, turn it up for louder sound and down for quieter.
Variable
A variable is something that can change. Think of it like a labelled box: you pop something inside, and the label tells you what it is. You can swap what's inside whenever you like.
Real-world example: A variable called score might start at 0, then change to 1, 2 and 3 as you collect points in a game.
Frequency
A frequency is just a number that tells a buzzer which note to play. A small number makes a low sound, and a big number makes a high sound.
Real-world example: Setting a buzzer to a low number gives a deep, rumbly note, while a high number makes a squeaky, high-pitched one, a bit like the left and right ends of a piano.
Buzzer
A buzzer is a tiny speaker that makes beeps and tones when you send it electricity. By telling it different numbers, you can make it play notes and tunes.
Real-world example: The beep a microwave makes when your food is ready comes from a buzzer.
Button
A button is a switch you press to tell your project to do something. The code can check whether it's being pressed or not.
Real-world example: Pressing a doorbell is just like pressing a button, one press sends a signal that makes something happen.
OLED screen
An OLED screen is a small display that shows words, numbers and pictures from your code. On some kits it's labelled the "LED display", but it's the same little screen.
Real-world example: Like the small screen on a fitness watch showing your steps, an OLED screen can show a score or a countdown.
PicoBricks
PicoBricks is an all-in-one coding kit that joins up handy parts, like a screen, a buzzer, buttons and lights, onto one board, so you can build projects without any fiddly wiring.
Real-world example: It's a bit like a Lego baseboard for electronics: everything clicks together in one place, ready to code.
Module
A module is a small part that does one job, like a buzzer, a button or a screen. You connect modules to the main board to give your project new powers.
Real-world example: Like adding different attachments to a toy, each module snaps on to add a new ability, sound, light or buttons.
Function
A function is a chunk of code you give a name to, so you can use it again and again without building it from scratch each time. Think of it like a favourite recipe, you write down the steps once, then follow it whenever you need it.
Real-world example: Like writing out a pancake recipe once. Whenever you fancy pancakes, you just follow the recipe again rather than working it all out from scratch.
Repeat loop
A repeat loop does its instructions a set number of times, then stops. You tell it exactly how many goes you want.
Real-world example: "Repeat 3 times: blow out a candle." After the third candle, the loop is finished, no matter what.
Forever loop
A forever loop repeats its instructions again and again without ever stopping (until you switch off or reset). It's perfect for anything you want to keep happening over and over.
Real-world example: Like a clock's second hand that keeps ticking round and round, a forever loop keeps running the same steps over and over.
If statement
An if statement checks whether something is true, and only runs its instructions when it is. It's how code makes decisions.
Real-world example: "If it's cold, put on a coat." If it's warm, you skip the coat, the action only happens when the check is true.
Set up your PicoBricks
- Open your favourite web browser. We recommend either Google Chrome or Microsoft Edge. Type ide.picobricks.com into the address bar.
- Connect the PicoBricks board to your computer using the USB cable.
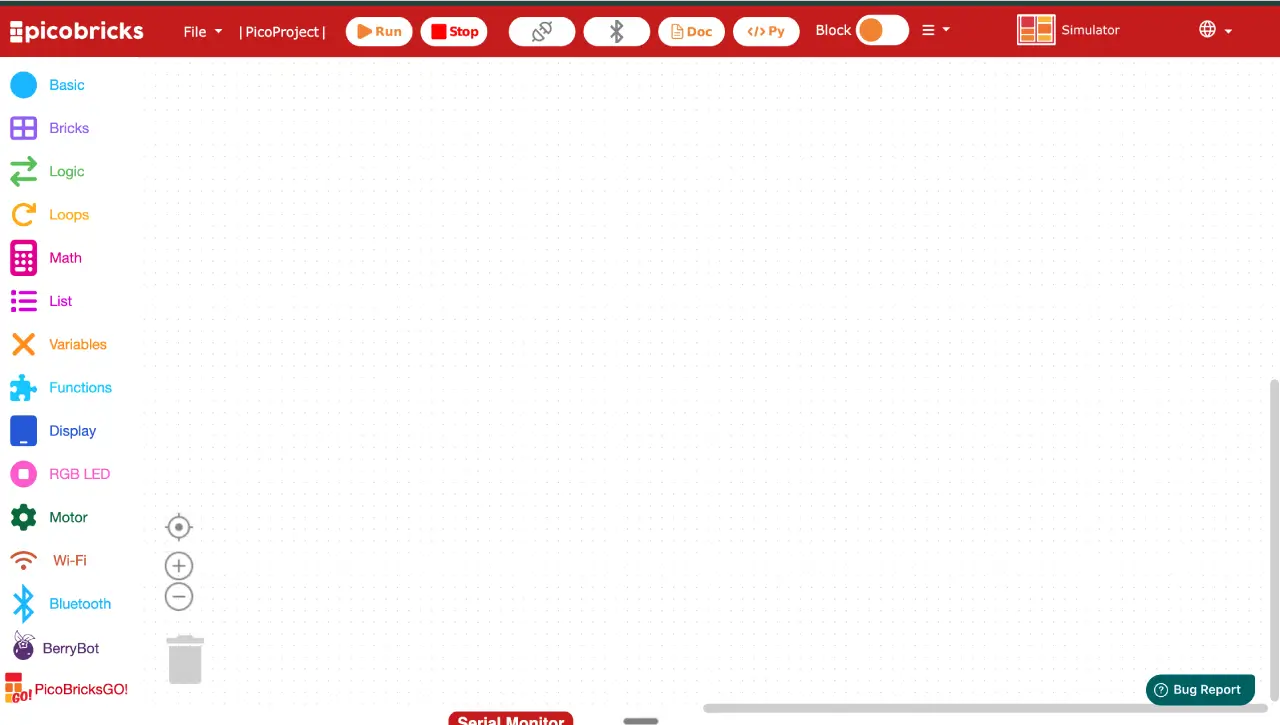
- Connect the PicoBricks board to the Brick IDE by selecting the Connection button at the top of the code area.
Create your variables
We need two VariableA variable is something that can change. Think of it like a labelled box: you pop something inside, and the label tells you what it is. You can swap what's inside whenever you like.Full entry →. One called beat and one called rhythm.
- Select Variables.
- Select Create a Variable.
- Type
beatand press Enter on your keyboard. - Do exactly the same again to make the
rhythmvariable, but this time typerhythm.
The beat variable will control how long each note lasts.
The rhythm variable will store the speed we read from the potentiometer.
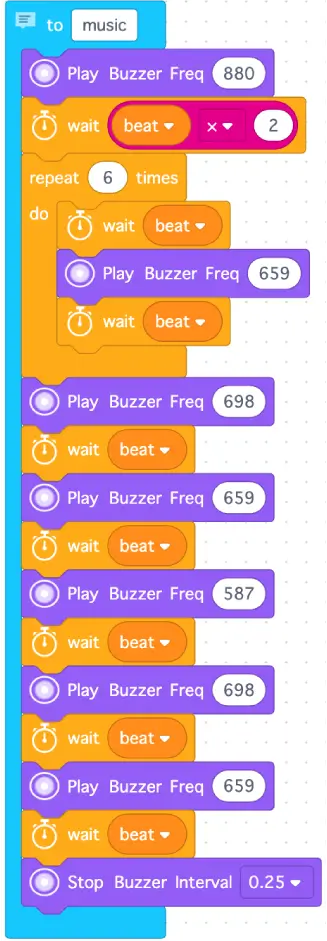
Make the music function
A FunctionA function is a chunk of code you give a name to, so you can use it again and again without building it from scratch each time. Think of it like a favourite recipe, you write down the steps once, then follow it whenever you need it.Full entry → is a chunk of code you can use again and again. This one plays our tune.
- Select Functions. Select and drag a
to do somethingblock to the code area and drop it. - Select
do somethingand type music. - Select Bricks and select and drag a
Play Buzzer Freqblock to the code area. Attach it within themusicblock. - Change 300 to 880.
- Select Loops. Select and drag a
waitblock to the code area and attach it under thePlay Buzzer Freq 880block. - Select Math. Select and drag a
1 + 1block to the code area and attach it within thewaitblock where it says 1. - Select Variables. Select the
beatvariable and drag it to the code area, attaching it within the first 1 of thewaitblock. - Change the + to x.
- Change the remaining 1 to 2.
This makes the first note last for two beats.
Now add the repeating part of the tune.
- Select Loops. Select and drag a
repeatblock to the code area and attach it below thewait for 2block. - Change 10 to 6.
- Select Loops. Select and drag a
waitblock to the code area and attach it within therepeatblock. - Select Variables. Select and drag a
beatblock to the code area and attach it within thewaitblock. - Select Bricks. Select and drag a
Play Buzzer Freqblock to the code area and attach it below thewait beatblock. - Change 300 to 659.
- Duplicate the
waitblock by right-clicking and selecting Duplicate. Attach the duplicated block under thePlay Buzzer Freq 659block.
Next, build the rest of the tune.
- Duplicate a
Play Buzzer Freqblock and attach it under therepeatblock. Change the number to 698. - Duplicate a
waitblock and attach it below thePlay Buzzer Freq 698block. - Duplicate a
Play Buzzer Freq 659block and attach it under thewaitblock. - Duplicate a
waitblock and attach it under thePlay Buzzer Freq 659block. - Duplicate a
Play Buzzer Freq 659block and attach it under thewaitblock. Change 659 to 587. - Duplicate a
waitblock and attach it under thePlay Buzzer Freq 587block. - Duplicate a
Play Buzzer Freq 698block and attach it below thewait beatblock. - Duplicate a
wait beatblock and attach it under thePlay Buzzer Freq 698block. - Duplicate a
Play Buzzer Freq 659block and attach it under thewait beatblock. - Duplicate a
wait beatblock and attach it below thePlay Buzzer Freq 659block. - Select Bricks. Select and drag a
Stop Buzzer Intervalblock to the code area and attach it under thewait beatblock.
Build the start-up code
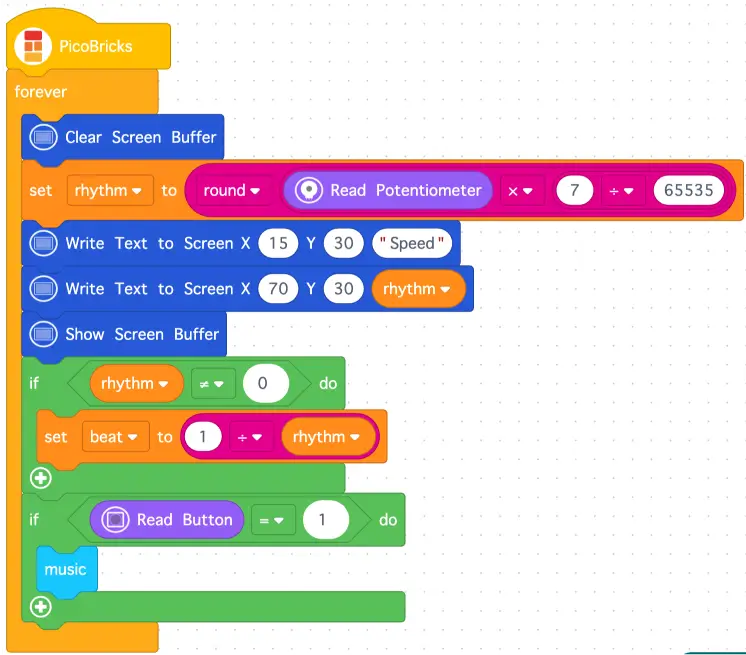
This code runs as soon as you switch on. It reads the dial, shows the speed on the screen, and waits for you to press the button.
Tricky maths alert!
This part uses some clever maths to turn the dial into a speed. Don't worry if it feels hard, even grown-ups find this bit tricky!
Just follow each step carefully and copy the blocks exactly. The code reads the dial and works out how fast to play your tune.
- Select Basic. Select and drag a
PicoBricksblock to the code area and drop it. - Select Loops. Select and drag a Forever loopA forever loop repeats its instructions again and again without ever stopping (until you switch off or reset). It's perfect for anything you want to keep happening over and over.Full entry → block to the code area and attach it below the
PicoBricksblock. - Select Variables. Select and drag a
set rhythmblock to the code area and attach it within theforeverblock. - Select Math. Select and drag a
roundblock to the code area and attach it within theset rhythm toblock. - Select Math. Select and drag a
1 + 1block to the code area and attach it within the 3.1 of theroundblock. Change the + to x. - Select Math. Select and drag a
1 + 1block to the code area and attach it within the second 1 of theroundblock. Change the + to ÷. - Select Bricks. Select and drag a
Read Potentiometerblock to the code area and attach it within the first 1 of theroundblock. - Change the next 1 to 7 and the remaining 1 to 65535.
Now show the speed on the screen.
- Select Display. Select and drag a
Clear Screen Bufferblock to the code area and attach it above theset rhythm toblock. - Select Display. Select and drag a
Write Text to Screenblock to the code area and attach it under theset rhythm toblock. - Change the X value to 15, the Y value to 30, and the text to Speed.
- Duplicate the
Write Text To Screenblock and attach it under theWrite Text To Screen X 15 Y 30 "Speed"block. - Change the X value to 70.
- Select Variables. Select and drag a
rhythmblock to the code area and attach it in place of the text. - Select Display. Select and drag a
Show Screen Bufferblock to the code area and attach it under theWrite Text To Screen X 70 Y 30 rhythmblock.
Next, set the beat.
- Select Logic. Select and drag an If statementAn if statement checks whether something is true, and only runs its instructions when it is. It's how code makes decisions.Full entry → block to the code area, attaching it under the
Show Screen Bufferblock. - Select Logic. Select and drag an
=block to the code area and attach it within the blank space of theifblock. - Change the = to ≠.
- Select Variables. Select and drag a
rhythmblock to the code area and attach it within the first blank of theifblock. - Select Math. Select and drag a
0block to the code area and attach it within the blank space of theifblock. - Select Variables. Select and drag a
set rhythmblock to the code area and attach it within theif rhythm ≠ 0 doblock. - Change rhythm to beat by selecting the little arrow on the block.
- Select Math. Select and drag a
1 + 1block to the code area and attach it within theset beat toblock. - Change the + to a ÷ sign.
- Select Variables. Select and drag a
rhythmblock to the code area and attach it within the second 1 of theset beat toblock.
Now add the button press.
- Select Logic. Select and drag an
ifblock to the code area and attach it under theif rhythm ≠ 0 doblock. - Select Logic. Select and drag an
=block to the code area and attach it within the blank space of theifblock. - Select Bricks. Select and drag a
Read Buttonblock to the code area and attach it within the first blank space of theifblock. - Select Math. Select and drag a
0block to the code area and attach it in the blank space of theifblock. - Change the 0 to 1.
- Select Functions. Select and drag a
musicblock to the code area and attach it within theif Read Button = 1 doblock.
Run it and listen
Now the code is finished, let's run it and check it works.
Select the Run button at the top of the code area.
Turn the potentiometer to change the speed of the music. You'll see the speed appear on the LED display. When you're ready, press the button to play your tune! 🎶
You have made your own PicoBricks music player. Brilliant work!
Try it yourself
Challenge: Try changing the frequency numbers in your music function to make up your very own tune. What happens if you use bigger numbers? What about smaller ones?
Stuck? Quick fixes
| Problem | Try this |
|---|---|
| You can't hear any music | Check the buzzer module is connected properly with its cable. |
| The speed doesn't change when you turn the dial | Check the potentiometer module is plugged in with its cable. |
| Nothing happens when you press the button | Make sure the button module is connected, and check your if Read Button = 1 block. |
| Your code won't run | Check the PicoBricks board is plugged into your computer with the USB cable. |