
Overview
In this project we are going to create our own countdown timer using PicoBricks.
Measuring time in electronic projects is really important. Think about a washing machine. It needs to know how long to spin the drum in each direction and how long the water needs to flow to dissolve the detergent.
Our timer will work a bit like that. When PicoBricks starts, it shows a welcome message and instructions for using the timer. As you turn the PotentiometerA potentiometer is a knob or dial that controls how much electricity flows through a circuit. Think of it like a tap for water: turn it one way and more comes out, turn it the other way and less comes out.Full entry →, it sets a value. Each press of the ButtonA button is a switch you press to tell your project to do something. The code can check whether it's being pressed or not.Full entry → locks that value in and moves you on to the next one: first the hours, then the minutes, then the seconds.
Once the time is set, the countdown begins and the remaining time is shown on the OLED screenAn OLED screen is a small display that shows words, numbers and pictures from your code. On some kits it's labelled the "LED display", but it's the same little screen.Full entry →. When the timer reaches zero, the BuzzerA buzzer is a tiny speaker that makes beeps and tones when you send it electricity. By telling it different numbers, you can make it play notes and tunes.Full entry → sounds and the LEDs light up until you press the button to stop them.
What you'll learn
- How to control and count down time within a project
- How to read a potentiometer to set a value
- How to use functions to keep your code tidy and reusable
- How to show numbers and messages on an OLED screen
- How to use a buzzer and LEDs to make an alarm
What you'll need
- PicoBricks Kit
- PicoBricks Brick IDE
- MicroUSB to USB cable
- Laptop or tablet for coding
Key words
Potentiometer
A potentiometer is a knob or dial that controls how much electricity flows through a circuit. Think of it like a tap for water: turn it one way and more comes out, turn it the other way and less comes out.
Real-world example: A volume dial on a speaker is a potentiometer, turn it up for louder sound and down for quieter.
Button
A button is a switch you press to tell your project to do something. The code can check whether it's being pressed or not.
Real-world example: Pressing a doorbell is just like pressing a button, one press sends a signal that makes something happen.
OLED screen
An OLED screen is a small display that shows words, numbers and pictures from your code. On some kits it's labelled the "LED display", but it's the same little screen.
Real-world example: Like the small screen on a fitness watch showing your steps, an OLED screen can show a score or a countdown.
Buzzer
A buzzer is a tiny speaker that makes beeps and tones when you send it electricity. By telling it different numbers, you can make it play notes and tunes.
Real-world example: The beep a microwave makes when your food is ready comes from a buzzer.
Variable
A variable is something that can change. Think of it like a labelled box: you pop something inside, and the label tells you what it is. You can swap what's inside whenever you like.
Real-world example: A variable called score might start at 0, then change to 1, 2 and 3 as you collect points in a game.
Function
A function is a chunk of code you give a name to, so you can use it again and again without building it from scratch each time. Think of it like a favourite recipe, you write down the steps once, then follow it whenever you need it.
Real-world example: Like writing out a pancake recipe once. Whenever you fancy pancakes, you just follow the recipe again rather than working it all out from scratch.
While loop
A while loop keeps repeating its instructions for as long as something stays true. The moment that thing stops being true, the loop stops.
Real-world example: "While it's still raining, keep the umbrella up." As soon as the rain stops, you put the umbrella down, and the loop ends.
Forever loop
A forever loop repeats its instructions again and again without ever stopping (until you switch off or reset). It's perfect for anything you want to keep happening over and over.
Real-world example: Like a clock's second hand that keeps ticking round and round, a forever loop keeps running the same steps over and over.
If statement
An if statement checks whether something is true, and only runs its instructions when it is. It's how code makes decisions.
Real-world example: "If it's cold, put on a coat." If it's warm, you skip the coat, the action only happens when the check is true.
Set up your PicoBricks
- Open your favourite web browser. We recommend Google Chrome or Microsoft Edge.
- Type ide.picobricks.com into the address bar to open the PicoBricks coding editor.
- Connect the PicoBricks board to your computer with the USB cable.
- Select the Connection button at the top of your code editor to pair the Raspberry Pi Pico with the code editor.
Build the starter function
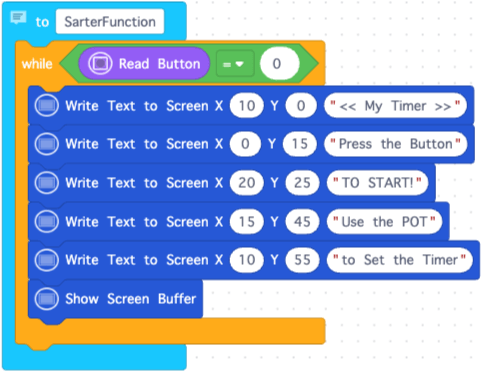
First, we will create a FunctionA function is a chunk of code you give a name to, so you can use it again and again without building it from scratch each time. Think of it like a favourite recipe, you write down the steps once, then follow it whenever you need it.Full entry → that shows a welcome message on the screen. This tells the person using the timer what to do before they start.
- Select Functions. Select a
to do somethingblock and drop it within the code area. - Change do something to StarterFunction.
- Select Loops. Select a While loopA while loop keeps repeating its instructions for as long as something stays true. The moment that thing stops being true, the loop stops.Full entry → block and snap it inside the
to StarterFunctionblock. - Select Logic. Select an
=block and snap it onto thewhileblock. - Select Bricks. Select a
Read Buttonblock and snap it onto thewhileblock before the = sign. - Select Math. Select a
0block and snap it onto thewhileblock after the = sign. - Select Display. Select a
Write Text to Screenblock and snap it inside thewhile Read Button = 0block. - Change the X value to 10 and change PicoBricks to << My Timer >>.
- Select Display. Select another
Write Text to Screenblock and snap it under the first one. - Change the Y value to 15 and change PicoBricks to Press the Button.
- Select Display. Select another
Write Text to Screenblock and snap it under that. - Change PicoBricks to To START!
- Select Display. Select another
Write Text to Screenblock and snap it underneath. - Change the X value to 15, the Y value to 45, and change PicoBricks to Use the POT.
- Select Display. Select another
Write Text to Screenblock and snap it underneath. - Change the X value to 10, the Y value to 55, and change PicoBricks to to Set the Timer.
- Select Display. Select a
Show Screen Bufferblock and snap it underneath.
POT is short for potentiometer. That is the little dial we will turn to set the timer.
Build the hour function
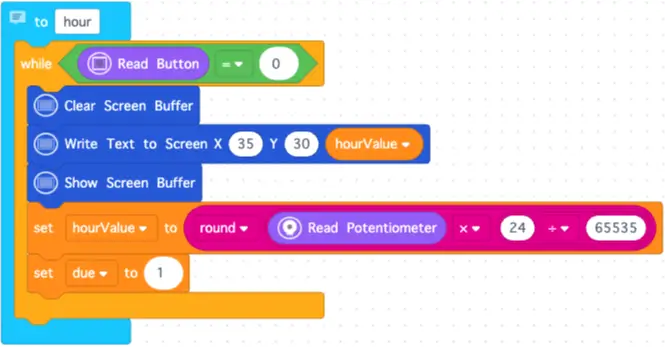
Next, we will create the hour function. This lets us use the potentiometer to choose how many hours we want on the timer.
- Select Functions. Select a
to do somethingblock and drop it within the code area. - Change do something to hour.
- Select Loops. Select a
whileblock and snap it inside theto hourblock. - Select Logic. Select an
=block and snap it onto thewhileblock. - Select Bricks. Select a
Read Buttonblock and snap it onto thewhileblock before the = sign. - Select Math. Select a
0block and snap it onto thewhileblock after the = sign. - Select Display. Select a
Clear Screen Bufferblock and snap it inside thewhile Read Button = 0block. - Select Display. Select a
Write Text to Screenblock and snap it under theClear Screen Bufferblock. - Change the X value to 35 and the Y value to 30.
- Select Variables. Select Create Variable and type hourValue.
- Select a
hourValueblock and snap it onto theWrite Text to Screenblock where it says PicoBricks. - Select Display. Select a
Show Screen Bufferblock and snap it underneath. - Select Variables. Select a
set hourValue toblock and snap it under theShow Screen Bufferblock. - Select Math. Select a
roundblock and snap it onto theset hourValue toblock. - Select Math. Select a
1 + 1block and snap it onto theroundblock where it says 3.1. - Change the + to x.
- Select Bricks. Select a
Read Potentiometerblock and snap it into the first 1 of the maths block. - Select Math. Select a
1 + 1block and snap it into the second 1 of the maths block. - Change the first 1 to 24, the + sign to ÷, and the remaining 1 to 65535.
- Select Variables. Select Create Variable and type due.
- Select a
set due toblock and snap it below theset hourValue to round Read Potentiometer x 24 ÷ 65535block. - Select Math. Select a
0block and snap it onto theset due toblock. - Change the 0 to 1.
This part turns the dial reading into a number of hours. The due variable helps the code know which part of the timer setup should happen next.
Build the minutes function
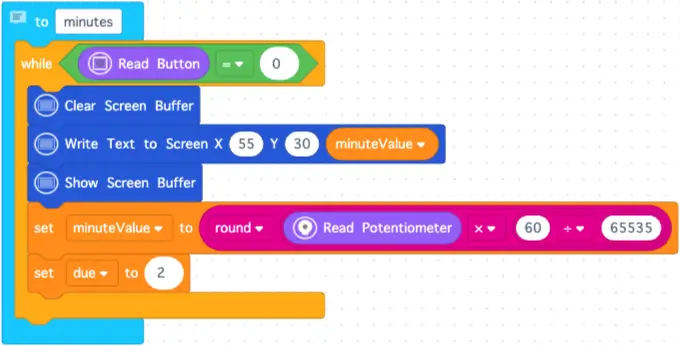
The minutes function works almost the same way as the hour function, but this time it sets the minutes.
- Select Functions. Select a
to do somethingblock and drop it in the code area. - Change do something to minutes.
- Select Loops. Select a
whileblock and snap it inside theto minutesblock. - Select Logic. Select an
=block and snap it onto thewhileblock. - Select Bricks. Select a
Read Buttonblock and snap it onto thewhileblock before the = sign. - Select Math. Select a
0block and snap it onto thewhileblock after the = sign. - Select Display. Select a
Clear Screen Bufferblock and snap it within thewhile Read Button = 0block. - Select Display. Select a
Write Text to Screenblock and snap it under theClear Screen Bufferblock. - Change the X value to 55 and the Y value to 30.
- Select Variables. Select Create Variable and type minuteValue.
- Select a
minuteValueblock and snap it onto theWrite Text to Screenblock where it says PicoBricks. - Select Display. Select a
Show Screen Bufferblock and snap it underneath. - Select Variables. Select a
set minuteValue toblock and snap it under theShow Screen Bufferblock. - Select Math. Select a
roundblock and attach it within theset minuteValue toblock. - Select Math. Select a
1 + 1block and attach it within the 3.1 of theroundblock. - Change the + sign to x.
- Select Bricks. Select a
Read Potentiometerblock and snap it within the first 1 of the maths block. - Select Math. Select a
1 + 1block and snap it within the second 1 of the maths block. - Change the first 1 to 60, the + to ÷, and the remaining 1 to 65535.
- Select Variables. Select a
set minuteValue toblock and snap it underneath. - Change minuteValue to due.
- Select Math. Select a
0block and snap it onto theset due toblock. - Change 0 to 2.
Build the seconds function
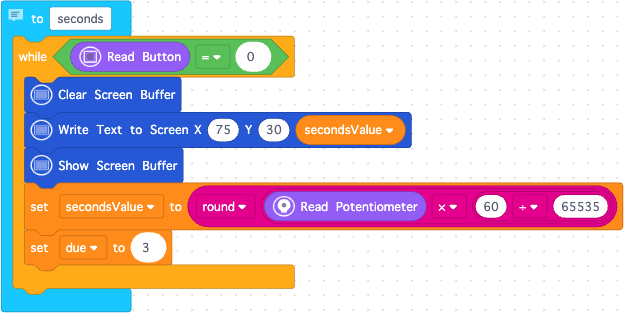
Now we will create the seconds function. This sets the seconds before the countdown begins.
- Select Functions. Select a
to do somethingblock and drop it in the code area. - Change do something to seconds.
- Select Loops. Select a
whileblock and snap it within theto secondsblock. - Select Logic. Select an
=block and snap it onto thewhileblock. - Select Bricks. Select a
Read Buttonblock and snap it onto thewhileblock before the =. - Select Math. Select a
0block and snap it onto thewhileblock after the =. - Select Display. Select a
Clear Screen Bufferblock and snap it within thewhile Read Button = 0block. - Select Display. Select a
Write Text to Screenblock and snap it under theClear Screen Bufferblock. - Change the X value to 75 and the Y value to 30.
- Select Variables. Select Create Variable and type secondsValue.
- Select a
secondsValueblock and snap it onto theWrite Text to Screenblock where it says PicoBricks. - Select Display. Select a
Show Screen Bufferblock and snap it underneath. - Select Variables. Select a
set secondsValue toblock and snap it under theShow Screen Bufferblock. - Select Math. Select a
roundblock and snap it onto theset secondsValue toblock. - Select Math. Select a
1 + 1block and snap it onto theroundblock where it says 3.1. - Select Bricks. Select a
Read Potentiometerblock and snap it into the first 1. - Change the + sign to x.
- Select Math. Select a
1 + 1block and snap it into the second 1. - Change the first 1 to 60, the + to ÷, and the remaining 1 to 65535.
- Select Variables. Select a
set secondsValue toblock and snap it underneath. - Change secondsValue to due.
- Select Math. Select a
0block and snap it to theset due toblock. - Change the 0 to 3.
Build the clock function
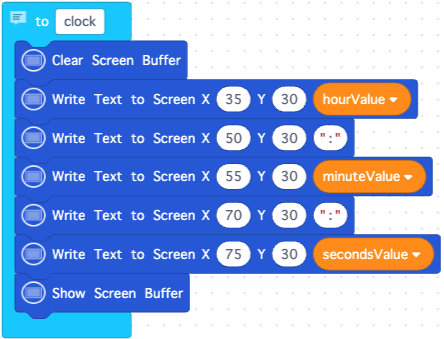
The clock function puts the hours, minutes and seconds together on the OLED screen.
- Select Functions. Select a
to do somethingblock and drop it in the code area. - Change do something to clock.
- Select Display. Select a
Clear Screen Bufferblock and snap it within theto clockblock. - Select Display. Select a
Write Text to Screenblock and snap it under theClear Screen Bufferblock. - Change the X value to 35 and the Y value to 30.
- Select Variables. Select a
hourValueblock and snap it onto theWrite Text to Screenblock where it says PicoBricks. - Select Display. Select a
Write Text to Screenblock and snap it underneath. - Change the X value to 50, the Y value to 30, and change PicoBricks to :.
- Select Display. Select another
Write Text to Screenblock and snap it underneath. - Change the X value to 55 and the Y value to 30.
- Select Variables. Select a
minuteValueblock and snap it onto the block where it says PicoBricks. - Select Display. Select another
Write Text to Screenblock and snap it underneath. - Change the X value to 70, the Y value to 30, and change PicoBricks to :.
- Select Display. Select another
Write Text to Screenblock and snap it underneath. - Change the X value to 75 and the Y value to 30.
- Select Variables. Select a
secondsValueblock and snap it onto the block where it says PicoBricks. - Select Display. Select a
Show Screen Bufferblock and snap it underneath.
Build the control function
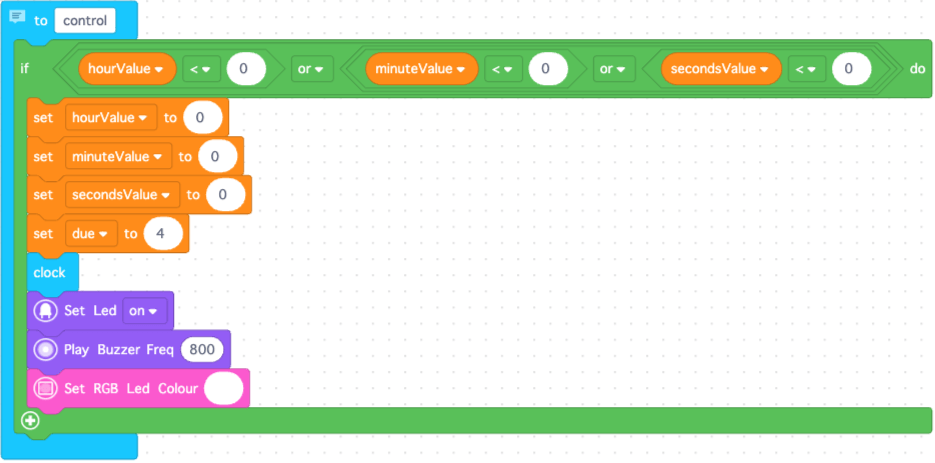
The control function checks whether the countdown has finished. When the timer reaches zero, it switches on the alarm.
- Select Functions. Select a
to do somethingblock and drop it in the code area. - Change do something to control.
- Select Logic. Select an If statementAn if statement checks whether something is true, and only runs its instructions when it is. It's how code makes decisions.Full entry → block and snap it within the
to controlblock. - Select Logic. Select an
andblock and snap it onto theifblock. - Select Logic. Select an
=block and snap it within theifblock before the and. - Select Variables. Select a
hourValueblock and snap it onto theifblock before the = sign. - Change the = sign to a < sign.
- Select Math. Select a
0block and snap it onto theifblock before the and. - Change the and to or.
- Select Logic. Select an
andblock and snap it onto theifblock after the or. - Select Logic. Select an
=block and snap it onto theifblock before the and. - Select Variables. Select a
minuteValueblock and snap it onto theifblock within the blank space after the or. - Change the = to <.
- Select Math. Select a
0block and snap it onto theifblock after the < symbol. - Change the and to or.
- Select Logic. Select an
=block and snap it onto theifblock after the or. - Select Variables. Select a
secondsValueblock and snap it onto theifblock after the or. - Change the = to a < symbol.
- Select Math. Select a
0block and snap it within the remaining blank space of theifblock. - Select Variables. Select a
set secondsValue toblock and snap it within theif hourValue < 0 or minuteValue < 0 or secondsValue < 0 doblock. - Change secondsValue to hourValue.
- Select Math. Select a
0block and snap it onto theset hourValue toblock. - Select Variables. Select a
set secondsValue toblock and snap it underneath. - Change secondsValue to minuteValue.
- Select Math. Select a
0block and snap it onto theset minuteValue toblock. - Select Variables. Select a
set secondsValue toblock and snap it underneath. - Select Math. Select a
0block and snap it onto theset secondsValue toblock. - Select Variables. Select a
set secondsValue toblock and snap it underneath. - Change secondsValue to due.
- Select Math. Select a
0block and snap it onto theset due toblock. - Change 0 to 4.
- Select Functions. Select a
clockblock and snap it underneath. - Select Bricks. Select a
Set Ledblock and snap it underneath. - Select Bricks. Select a
Play Buzzer Freqblock and snap it underneath. - Change 300 to 800.
- Select RGB LED. Select a
Set RGB Led Colourblock and snap it underneath.
This is the alarm part of the timer. When the countdown finishes, the buzzer sounds and the lights turn on.
Build the timer function
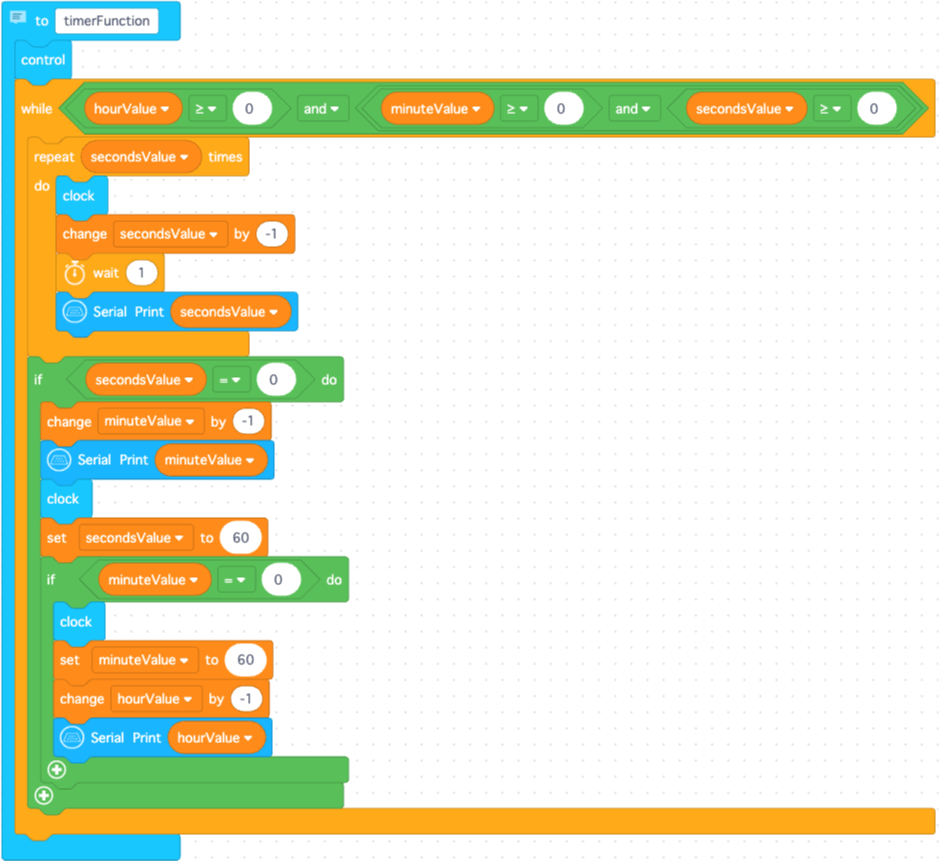
Now it is time to build the timer function. This is the part that counts down the time.
- Select Functions. Select a
to do somethingblock and drop it in the code area. - Change do something to timerFunction.
- Select Functions. Select a
controlblock and snap it within thetimerFunctionblock. - Select Loops. Select a
whileblock and snap it underneath thecontrolblock. - Select Logic. Select an
andblock and snap it onto thewhileblock. - Select Logic. Select an
=block and snap it onto thewhileblock before the and. - Select Variables. Select a
hourValueblock and snap it onto thewhileblock before the = sign. - Change the = sign to a ≥ sign.
- Select Math. Select a
0block and snap it after the ≥ sign. - Select Logic. Select an
andblock and snap it onto thewhileblock after the and. - Select Logic. Select an
=block and snap it onto thewhileblock between the two and blocks. - Select Variables. Select a
minuteValueblock and snap it onto thewhileblock before the = sign. - Change the = sign to a ≥ sign.
- Select Math. Select a
0block and snap it after the ≥ sign. - Select Logic. Select an
=block and snap it onto thewhileblock after the and. - Select Variables. Select a
secondsValueblock and snap it onto thewhileblock before the = sign. - Change the = sign to a ≥ sign.
- Select Math. Select a
0block and snap it after the ≥ sign. - Select Loops. Select a
repeatblock and snap it within thewhile hourValue ≥ 0 and minuteValue ≥ 0 and secondsValue ≥ 0block. - Select Variables. Select a
secondsValueblock and snap it onto therepeatblock. - Select Functions. Select a
clockblock and snap it within therepeat secondsValue timesblock. - Select Variables. Select a
change secondsValue byblock and snap it under theclockblock. - Change the 1 to -1.
- Select Loops. Select a
waitblock and snap it underneath. - Select Basic. Select a
Serial Printblock and snap it underneath. - Select Variables. Select a
secondsValueblock and snap it onto theSerial Printblock where it says PicoBricks. - Select Logic. Select an
ifblock and snap it under therepeat secondsValue timesblock. - Select Logic. Select an
=block and snap it onto theifblock. - Select Math. Select a
0block and snap it onto theifblock before the = sign. - Select Variables. Select a
change secondsValue byblock and snap it within theif secondsValue = 0block. - Change secondsValue to minuteValue and 1 to -1.
- Select Basic. Select a
Serial Printblock and snap it underneath. - Select Variables. Select a
minuteValueblock and snap it onto theSerial Printblock where it says PicoBricks. - Select Functions. Select a
clockblock and snap it underneath. - Select Variables. Select a
set secondsValue toblock and snap it underneath. - Change 1 to 60.
- Select Logic. Select an
ifblock and snap it underneath. - Select Logic. Select an
=block and snap it onto theifblock. - Select Variables. Select a
minuteValueblock and snap it onto theifblock before the = sign. - Select Math. Select a
0block and snap it onto theifblock after the = sign. - Select Functions. Select a
clockblock and snap it within theif minuteValue = 0block. - Select Variables. Select a
set secondsValue toblock and snap it under theclockblock. - Change secondsValue to minuteValue.
- Select Math. Select a
0block and snap it onto theset minuteValue toblock. - Change the 0 to 60.
- Select Variables. Select a
change secondsValue byblock and snap it underneath. - Change secondsValue to hourValue and 1 to -1.
- Select Basic. Select a
Serial Printblock and snap it underneath. - Select Variables. Select a
hourValueblock and snap it onto theSerial Printblock where it says PicoBricks.
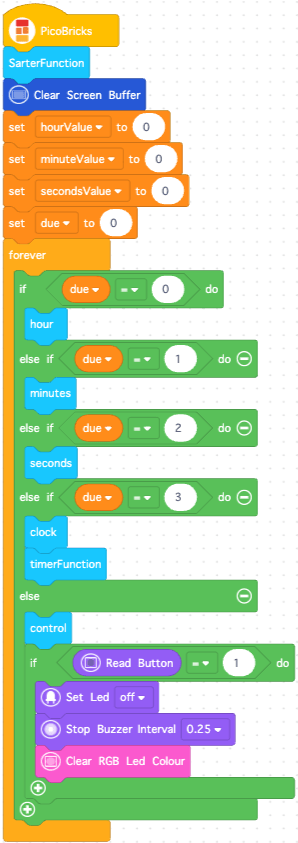
Build the starter code
We have now created all the functions. The last job is to create the main code that runs when PicoBricks starts.
- Select Basic. Select a
PicoBricksblock and drop it in the code area. - Select Functions. Select a
StarterFunctionblock and snap it to thePicoBricksblock. - Select Display. Select a
Clear Screen Bufferblock and snap it underneath. - Select Variables. Select a
set secondsValue toblock and snap it underneath. - Change secondsValue to hourValue.
- Select Math. Select a
0block and snap it onto theset hourValue toblock. - Select Variables. Select a
set secondsValue toblock and snap it underneath. - Change secondsValue to minuteValue.
- Select Math. Select a
0block and snap it onto theset minuteValue toblock. - Select Variables. Select a
set secondsValue toblock and snap it underneath. - Select Math. Select a
0block and snap it onto theset secondsValue toblock. - Select Variables. Select a
set secondsValue toblock and snap it underneath. - Change secondsValue to due.
- Select Math. Select a
0block and snap it onto theset due toblock. - Select Loops. Select a Forever loopA forever loop repeats its instructions again and again without ever stopping (until you switch off or reset). It's perfect for anything you want to keep happening over and over.Full entry → block and snap it underneath.
- Select Logic. Select an
ifblock and snap it within theforeverblock. - Select Logic. Select an
=block and snap it onto theifblock. - Select Variables. Select a
dueblock and snap it onto theifblock before the = sign. - Select Math. Select a
0block and snap it onto theifblock after the = sign. - Select Functions. Select a
hourblock and snap it into theif due = 0 doblock. - Select the + on the
ifblock two times to create anelse ifblock. - Select Logic. Select an
=block and snap it onto theelse ifblock. - Select Variables. Select a
dueblock and snap it onto theelse ifblock before the = sign. - Select Math. Select a
0block and snap it onto theelse ifblock after the = sign. - Change the 0 to 1.
- Select Functions. Select a
minutesblock and snap it within theelse if due = 1 doblock. - Select the + sign at the bottom of the
ifblock to create anotherelse ifblock. - Select Logic. Select an
=block and snap it onto theelse ifblock. - Select Variables. Select a
dueblock and snap it onto theelse ifblock before the = sign. - Select Math. Select a
0block and snap it onto theelse ifblock after the = sign. - Change the 0 to 2.
- Select Functions. Select a
secondsblock and snap it within theelse if due = 2 doblock. - Select the + sign at the bottom of the
ifblock to create anotherelse ifblock. - Select Logic. Select an
=block and snap it onto theelse ifblock. - Select Variables. Select a
dueblock and snap it onto theelse ifblock before the = sign. - Select Math. Select a
0block and snap it onto theelse ifblock after the = sign. - Change the 0 to 3.
- Select Functions. Select a
clockblock and snap it within theelse if due = 3 doblock. - Select Functions. Select a
timerFunctionblock and snap it under theclockblock. - Select Functions. Select a
controlblock and snap it within theelseblock. - Select Logic. Select an
ifblock and snap it under thecontrolblock. - Select Logic. Select an
=block and snap it onto theifblock. - Select Bricks. Select a
Read Buttonblock and snap it onto theifblock before the = sign. - Select Math. Select a
0block and snap it onto theifblock after the = sign. - Change 0 to 1.
- Select Bricks. Select a
Set Ledblock and snap it within theif Read Button = 1 doblock. - Change on to off.
- Select Bricks. Select a
Stop Buzzer Intervalblock and snap it underneath. - Select RGB LED. Select a
Clear RGB Led Colourblock and snap it underneath.
Run it and test
We have now completed all the code that we need. The next thing to do is test it and make sure it works as expected.
- Hit the Run button at the top of the code area to start the PicoBricks.
- You will see the startup message on the OLED display telling you to press the button to start.
- Press the button to start setting the timer.
- Turn the potentiometer to choose the number of hours.
- Press the button to lock in the hours and move to minutes.
- Turn the potentiometer to choose the number of minutes.
- Press the button to lock in the minutes and move to seconds.
- Turn the potentiometer to choose the number of seconds.
- Press the button to lock in the seconds and start the countdown.
- When the timer reaches zero, the buzzer sounds and the LED and RGB LED light up.
- Press the button to stop the alarm.
You have built your own countdown timer with PicoBricks. Brilliant work!
Try it yourself
Challenge: Can you make the alarm more exciting? Try changing the buzzer frequency so it plays a little tune when the timer reaches zero, or make the RGB LED flash through different colours instead of staying on one.
For an extra challenge, add a message on the screen that says Time's up! when the countdown finishes.
Stuck? Quick fixes
| Problem | Try this |
|---|---|
| Nothing appears on the OLED screen | Check the screen module is connected properly, and make sure you've added a Show Screen Buffer block after writing your text. Without it, the screen stays blank. |
| The timer won't start when I press the button | Make sure the button module is connected. Remember you need to press the button to set the hours, minutes and seconds before the countdown begins. |
| The numbers don't change when I turn the dial | Check the potentiometer is connected, and double-check you used a Read Potentiometer block in your hour, minutes and seconds functions. |
| My code won't upload to the PicoBricks | Check the USB cable is plugged in, then press the connection button at the top of the editor to pair the Raspberry Pi Pico again. |
| The buzzer doesn't sound at zero | Make sure the buzzer module is connected, and check your control function includes the Play Buzzer Freq block. |