
Overview
In this project we are going to design a game to test your reaction times against your friends.
When PicoBricks is turned on, a timer will start. The timer can detect time in MillisecondA millisecond is a tiny slice of time. There are 1,000 of them in just one second! That's why it's perfect for measuring things that happen really fast.Full entry →, which are tiny slices of time. Timers are used in lots of household items like ovens, air fryers and microwaves.
We will use the OLED screenAn OLED screen is a small display that shows words, numbers and pictures from your code. On some kits it's labelled the "LED display", but it's the same little screen.Full entry → to show a welcome message when PicoBricks starts and instructions on how to begin the game. The timer will count down from three. Once it hits zero, the LEDAn LED is a tiny light you can switch on and off (and sometimes change colour) with your code. LED is short for "light-emitting diode".Full entry → will turn on randomly anywhere from 1 to 5 seconds later.
When the LED turns on, the player has to press the ButtonA button is a switch you press to tell your project to do something. The code can check whether it's being pressed or not.Full entry → as fast as they can. This is the player’s reaction time, and it will be measured in milliseconds. The player’s reaction time will then be displayed on the OLED screen.
What you'll learn
- How to make a countdown timer
- How to use random numbers to surprise the player
- How to measure time in milliseconds
- How to make a button, an LED and a screen work together
What you'll need
- PicoBricks Kit
- PicoBricks Brick IDE
- MicroUSB to USB cable
- Laptop or tablet for coding
Key words
Millisecond
A millisecond is a tiny slice of time. There are 1,000 of them in just one second! That's why it's perfect for measuring things that happen really fast.
Real-world example: A blink of an eye takes around 300 milliseconds, so a really quick button press might be even faster than a blink.
Integer
An integer is just a whole number, like 1, 2 or 3. It has no bits after a dot, so 4 is an integer, but 4.5 isn't.
Real-world example: Counting down 3… 2… 1… uses integers, but a price like £4.99 isn't an integer because it has numbers after the dot.
Random
Random means you can't guess what's coming next, a bit like rolling a dice. The computer picks for you, so you get a different surprise each time.
Real-world example: Asking a computer for a random number between 1 and 6 is just like rolling a dice, you never know if you'll get a 1 or a 6.
Function
A function is a chunk of code you give a name to, so you can use it again and again without building it from scratch each time. Think of it like a favourite recipe, you write down the steps once, then follow it whenever you need it.
Real-world example: Like writing out a pancake recipe once. Whenever you fancy pancakes, you just follow the recipe again rather than working it all out from scratch.
Variable
A variable is something that can change. Think of it like a labelled box: you pop something inside, and the label tells you what it is. You can swap what's inside whenever you like.
Real-world example: A variable called score might start at 0, then change to 1, 2 and 3 as you collect points in a game.
While loop
A while loop keeps repeating its instructions for as long as something stays true. The moment that thing stops being true, the loop stops.
Real-world example: "While it's still raining, keep the umbrella up." As soon as the rain stops, you put the umbrella down, and the loop ends.
Forever loop
A forever loop repeats its instructions again and again without ever stopping (until you switch off or reset). It's perfect for anything you want to keep happening over and over.
Real-world example: Like a clock's second hand that keeps ticking round and round, a forever loop keeps running the same steps over and over.
Button
A button is a switch you press to tell your project to do something. The code can check whether it's being pressed or not.
Real-world example: Pressing a doorbell is just like pressing a button, one press sends a signal that makes something happen.
LED
An LED is a tiny light you can switch on and off (and sometimes change colour) with your code. LED is short for "light-emitting diode".
Real-world example: The little standby light on a TV is an LED, your code can flash one on and off the same way.
OLED screen
An OLED screen is a small display that shows words, numbers and pictures from your code. On some kits it's labelled the "LED display", but it's the same little screen.
Real-world example: Like the small screen on a fitness watch showing your steps, an OLED screen can show a score or a countdown.
Buzzer
A buzzer is a tiny speaker that makes beeps and tones when you send it electricity. By telling it different numbers, you can make it play notes and tunes.
Real-world example: The beep a microwave makes when your food is ready comes from a buzzer.
PicoBricks
PicoBricks is an all-in-one coding kit that joins up handy parts, like a screen, a buzzer, buttons and lights, onto one board, so you can build projects without any fiddly wiring.
Real-world example: It's a bit like a Lego baseboard for electronics: everything clicks together in one place, ready to code.
Raspberry Pi Pico
The Raspberry Pi Pico is a tiny, low-cost computer chip on a small board. It's the "brain" that stores your code and tells the other parts what to do.
Real-world example: It's like the brain inside a toy robot, small enough to fit in your hand, but clever enough to run your whole project.
Module
A module is a small part that does one job, like a buzzer, a button or a screen. You connect modules to the main board to give your project new powers.
Real-world example: Like adding different attachments to a toy, each module snaps on to add a new ability, sound, light or buttons.
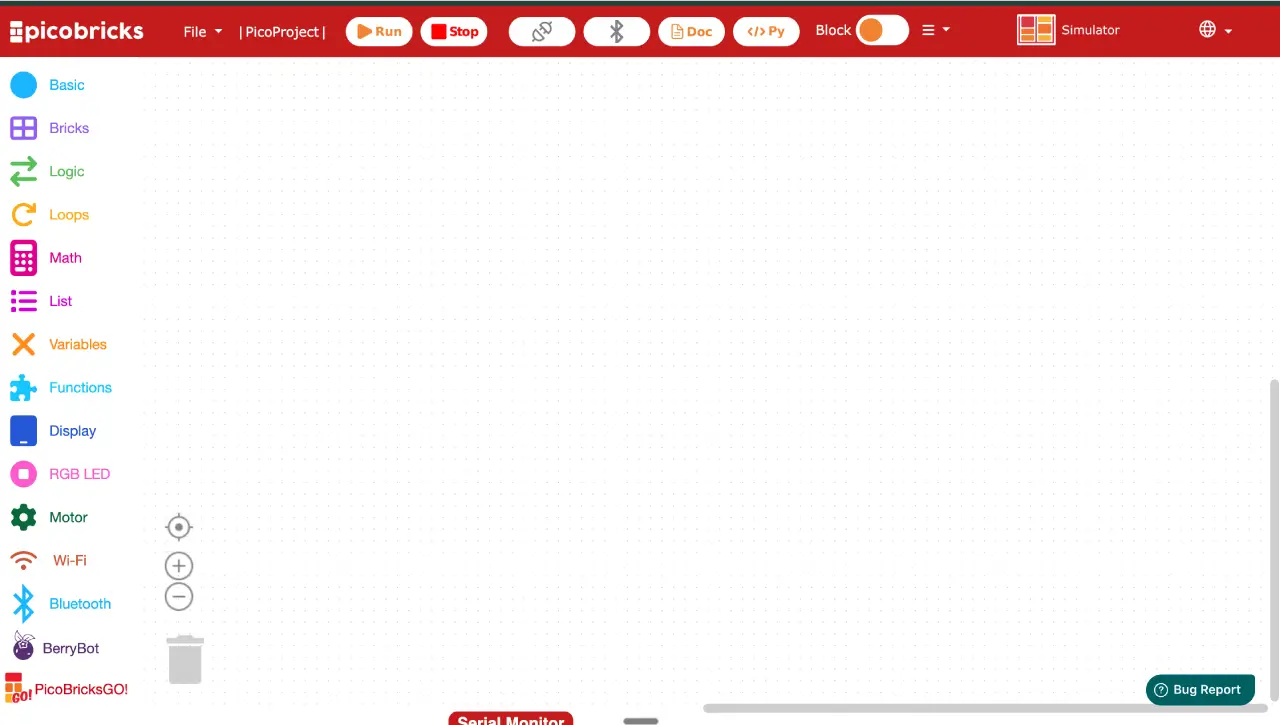
Set up your PicoBricks
- Open your favourite web browser. We recommend Google Chrome or Microsoft Edge.
- Type ide.picobricks.com into the address bar to open the PicoBricks coding editor.
- Connect the PicoBricks board to your computer with the USB cable.
- Select the Connection button at the top of your code editor to pair the Pico with the code editor.
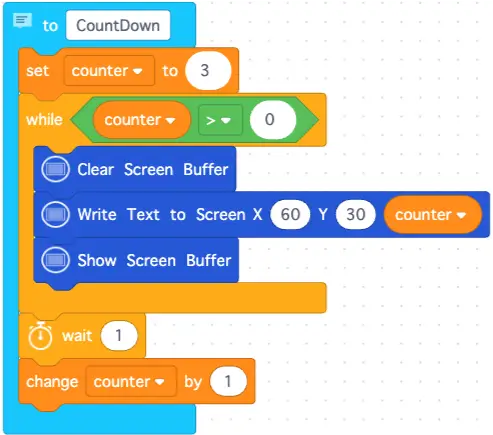
Create the CountDown function
First, we will create a FunctionA function is a chunk of code you give a name to, so you can use it again and again without building it from scratch each time. Think of it like a favourite recipe, you write down the steps once, then follow it whenever you need it.Full entry → called CountDown.
This function shows a countdown on the OLED screen before the game begins.
- Select Functions. Drag a
to do somethingblock into the code area and drop it. - Change do something to CountDown.
- Select Variables. Select Create Variable and type counter.
- Drag a
set counter toblock and snap it inside theto CountDownblock. - Select Math. Drag a
0block and snap it into the blank space on yourset counter toblock. - Change the 0 to 3.
- Select Loops. Drag a While loopA while loop keeps repeating its instructions for as long as something stays true. The moment that thing stops being true, the loop stops.Full entry → block and snap it below the
set counter to 3block. - Select Logic. Drag an
=block and snap it into the blank space on yourwhileblock. - Change the = sign to a > sign.
- Select Variables. Drag a
counterblock and snap it into the first blank space on yourwhileblock. - Select Math. Drag a
0block and snap it into the other blank space on yourwhileblock. - Select Display. Drag a
Clear Screen Bufferblock and snap it inside thewhile counter > 0block. - Select Display. Drag a
Write Text to Screenblock and snap it under theClear Screen Bufferblock. - Change the X value to 60 and the Y value to 30.
- Select Variables. Drag a
counterblock and snap it into the PicoBricks slot on yourWrite Text to Screenblock. - Select Display. Drag a
Show Screen Bufferblock and snap it under theWrite Text to Screen X 60 Y 30 counterblock. - Select Loops. Drag a
waitblock and snap it below theShow Screen Bufferblock. - Select Variables. Drag a
change counter byblock and snap it below thewait 1block. - Change the 1 to -1.
The countdown starts at 3, then changes the counter by -1 each time, so it counts down: 3, 2, 1.
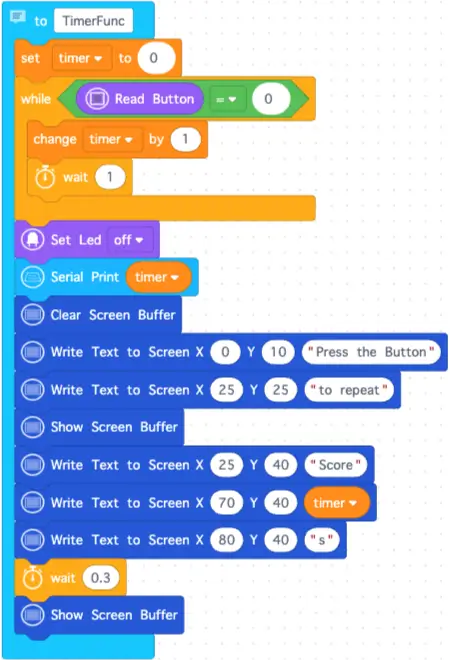
Create the Timer function
Next, we will create a function called TimerFunc.
This function measures how long it takes the player to press the button after the LED turns on.
- Select Functions. Drag a
to do somethingblock into the code area and drop it. - Change do something to TimerFunc.
- Select Variables. Select Create Variable and type timer.
- Drag a
set timer toblock and snap it inside theto TimerFuncblock. - Select Math. Drag a
0block and snap it into the blank space on yourset timer toblock. - Select Loops. Drag a
whileblock and snap it below theset timer to 0block. - Select Logic. Drag an
=block and snap it into the blank space on yourwhileblock. - Select Bricks. Drag a
Read Buttonblock and snap it into the first blank space on yourwhileblock. - Select Math. Drag a
0block and snap it into the other blank space on yourwhileblock. - Select Variables. Drag a
change timer byblock and snap it inside thewhile Read Button = 0block. - Select Loops. Drag a
waitblock and snap it under thechange timer by 1block. - Select Bricks. Drag a
Set Ledblock and snap it under thewhile Read Button = 0block. - Change on to off.
- Select Basic. Drag a
Serial Printblock and snap it under theSet Led offblock. - Select Variables. Drag a
timerblock and snap it into theSerial Printblock where it says PicoBricks. - Select Display. Drag a
Clear Screen Bufferblock and snap it under theSerial Print timerblock. - Select Display. Drag a
Write Text to Screenblock and snap it under theClear Screen Bufferblock. - Change the Y value to 10 and change PicoBricks to Press the Button.
- Select Display. Drag another
Write Text to Screenblock and snap it underneath. - Change the X and Y values to 25 and change PicoBricks to to repeat.
- Select Display. Drag a
Show Screen Bufferblock and snap it underneath. - Select Display. Drag another
Write Text to Screenblock and snap it under theShow Screen Bufferblock. - Change the X value to 25, the Y value to 40, and change PicoBricks to Score.
- Select Display. Drag another
Write Text to Screenblock and snap it underneath. - Change the X value to 70 and the Y value to 40.
- Select Variables. Drag a
timerblock and snap it into the PicoBricks slot on yourWrite Text to Screenblock. - Select Display. Drag another
Write Text to Screenblock and snap it underneath. - Change the X value to 80, the Y value to 40, and change PicoBricks to s for seconds.
- Select Loops. Drag a
waitblock and snap it underneath. - Change 1 to 0.3.
- Select Display. Drag a
Show Screen Bufferblock and snap it under thewait 0.3block.
This function keeps counting until the player presses the button. The quicker they press it, the lower their score will be.
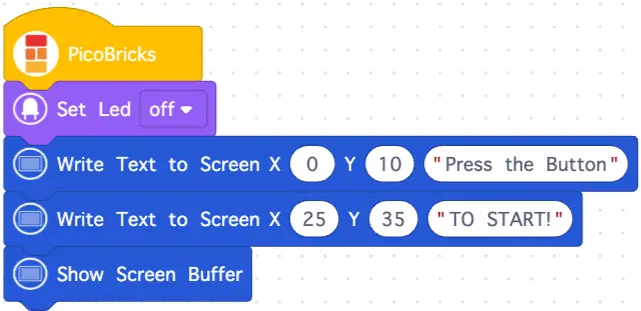
Create the game start code
Now we will create the code that starts the game and shows the player what to do.
- Select Basic. Drag a
PicoBricksblock into the code area and drop it. - Select Bricks. Drag a
Set Ledblock and snap it onto thePicoBricksblock. - Change on to off.
- Select Display. Drag a
Write Text to Screenblock and snap it under theSet Led offblock. - Change the Y value to 10 and change PicoBricks to Press the Button.
- Select Display. Drag another
Write Text to Screenblock and snap it underneath. - Change the X value to 25, the Y value to 35, and change PicoBricks to To Start!
- Select Display. Drag a
Show Screen Bufferblock and snap it underneath.
Build the forever loop
Next, we are going to create the Forever loopA forever loop repeats its instructions again and again without ever stopping (until you switch off or reset). It's perfect for anything you want to keep happening over and over.Full entry → code that runs our reaction game.
This code will:
- Clear the OLED screen after the button is pressed
- Start the countdown when the
CountDownfunction is called - Turn the LED on randomly after Go!!! has been displayed
- Print the score once we call the
TimerFuncfunction
- Select Loops. Drag a
foreverblock and snap it under theShow Screen Bufferblock. - Select Loops. Drag a
whileblock and snap it inside theforeverblock. - Select Logic. Drag an
=block and snap it into the blank space on yourwhileblock. - Select Bricks. Drag a
Read Buttonblock and snap it into the first blank space on yourwhileblock. - Select Math. Drag a
0block and snap it into the other blank space on yourwhileblock. - Change the 0 to 1.
- Select Display. Drag a
Clear Screen Bufferblock and snap it inside thewhile Read Button = 1block. - Select Functions. Drag a
CountDownblock and snap it below theClear Screen Bufferblock. - Select Display. Drag a
Clear Screen Bufferblock and snap it under theCountDownblock. - Select Display. Drag a
Write Text to Screenblock and snap it under theClear Screen Bufferblock. - Change the X value to 60, the Y value to 20, and change PicoBricks to Go!!!.
- Select Display. Drag a
Show Screen Bufferblock and snap it below theWrite Text to Screen X 60 Y 20 "Go!!!"block. - Select Loops. Drag a
waitblock and snap it below theShow Screen Bufferblock. - Select Math. Drag a
random integer fromblock and snap it into the 1 slot on yourwaitblock. - Change the 100 to 5.
- Select Bricks. Drag a
Set Ledblock and snap it under thewait random integer 1 to 5block. - Select Functions. Drag a
TimerFuncblock and snap it under theSet Led onblock.
The random wait means the LED will not turn on at the same time every round. That makes the game harder because the player cannot guess when to press the button.
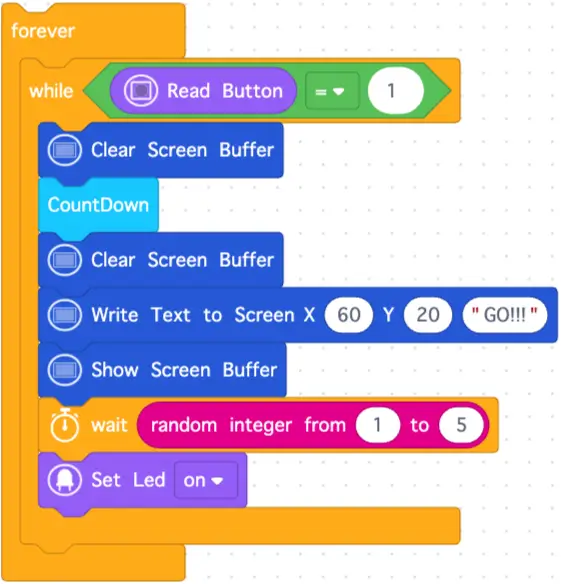
Check your completed code
This is now our completed forever loop code and all the code needed to run our reaction time game.
Before you press Run, compare your blocks with the completed code below.
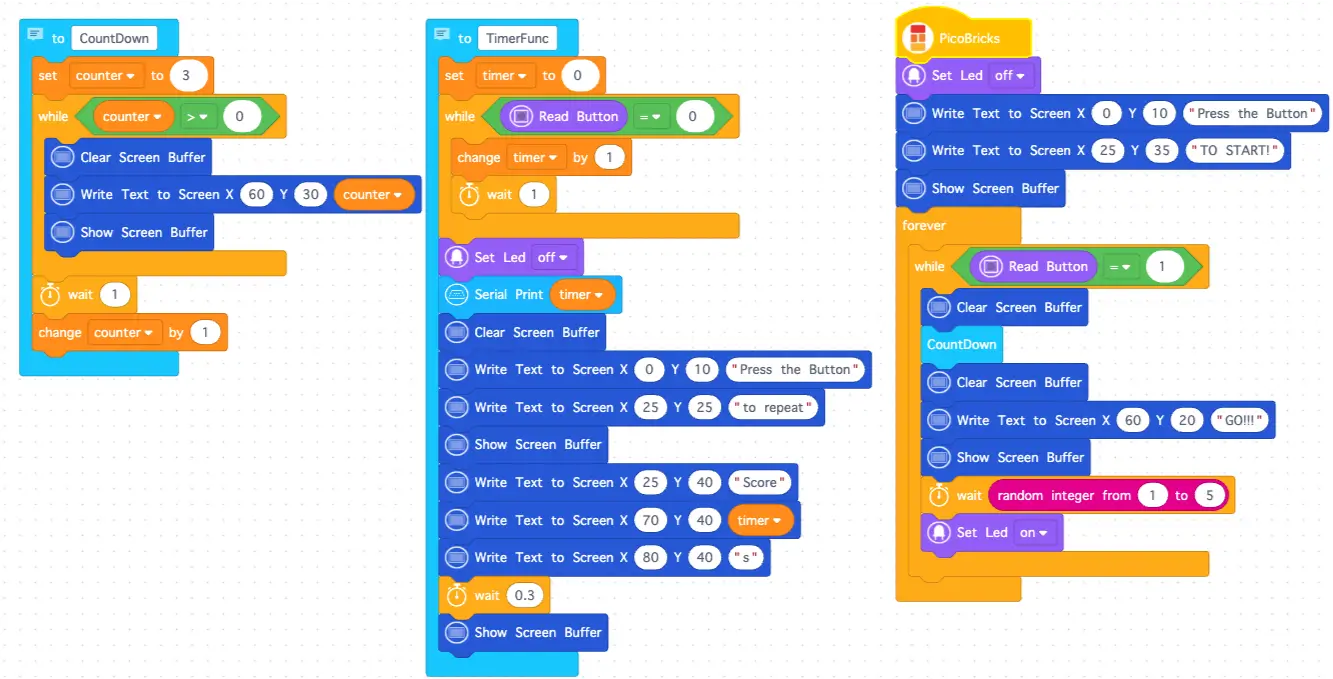
Run it and test
Now the code is finished, let’s test the reaction game.
- Select the Run button at the top of the code area.
- Press the button to start the game.
- Watch the countdown on the OLED screen.
- Wait for the LED to turn on.
- When the LED turns on, press the button again as fast as you can.
- Check your reaction time on the OLED screen.
- Press the button again if you want to repeat the game.
You have built your own reaction-time game with PicoBricks. Now challenge someone nearby and see who can react the fastest!
Try it yourself
Challenge: Can you make the game even cleverer?
Try adding a buzzer that beeps when the LED lights up, or keep score so you can play best of 3 against a friend.
Stuck? Quick fixes
Remember: mistakes are part of learning!
| Problem | Try this |
|---|---|
| The screen stays blank | Check the OLED screen is plugged in properly, and that you added a Show Screen Buffer block after writing your text. |
| My code won't connect | Make sure the USB cable is pushed in all the way, then click the Connection button to pair your Pico. |
| The LED never lights up | Check your Set Led block says on (not off) in the forever loop, and that the LED module is connected. |
| The timer keeps counting forever | Remember to press the button after the LED lights up, as that's what tells the timer to stop. |